
.png)
How to Annotate a Screenshot: Tips & Best Tools
- shems sheikh
- May 9, 2025
- 10 min read
Why Screenshot Annotation Transforms Communication
Let's be honest, a simple screenshot rarely tells the full story. It's like trying to explain a complex concept with a single word – it just doesn't work. Annotating a screenshot, however, changes that static image into a powerful communication tool. It provides crucial context, clarifies meaning, and directs the viewer's attention to the important details. This means your audience understands your message clearly and efficiently.
The Power of Visual Communication
Think about how much simpler it is to understand a diagram with clear labels and highlighted sections. Annotated screenshots work the same way, minimizing confusion and speeding up how quickly we process information. For example, studies have shown that well-annotated screenshots can reduce miscommunication by up to 65%. They make complicated information easier to grasp, which is particularly useful in today's fast-paced work environments.
Clarity Across Contexts
Different situations benefit from different annotation styles. Technical documents, for instance, often use precise callouts and labels. Imagine numbered steps highlighting the order of actions within a software interface. Client presentations, on the other hand, might need a more visually appealing style. Using color-coded highlights and short explanations can emphasize key features. For impactful annotated screenshots, especially in business, consider ways to reduce file size. This ensures efficient sharing and quicker loading times, leading to smoother communication.
The Brain on Annotations
Our brains process visuals and text differently. Images, especially those with clear annotations, are simpler to remember and understand. Annotations provide visual cues that help us organize and retain information more effectively. The growth of data annotation tools reflects our increasing reliance on visual data. In fact, the global market for these tools is expected to hit $2.99 billion by 2025, growing from $2.33 billion in 2024. This growth highlights the increasing importance of tools that help us make sense of visual information, just like annotating screenshots. This shift towards visual communication demonstrates how annotation makes information more accessible and engaging.
Finding Your Perfect Screenshot Annotation Toolkit
Choosing the right screenshot annotation tool can feel overwhelming with the sheer number of options out there. From simple built-in OS utilities to powerful dedicated software, finding the perfect fit depends on your individual needs. This section helps you evaluate different tools based on your workflow and what you want to achieve.
Built-In vs. Dedicated Tools: Finding the Right Balance
Most operating systems offer basic screenshot annotation features. These are often enough for quick markups and simple edits. However, for more complex annotations, like step-by-step guides or detailed visual feedback, dedicated annotation tools offer a wider range of capabilities. These tools provide advanced functions like precise callouts, customizable shapes, and features for collaboration.
Key Features to Consider
When choosing a screenshot annotation toolkit, think about these key features:
Annotation Types: Does the tool offer the variety you need? Look for arrows, shapes, text boxes, highlights, and blurring tools.
Editing Capabilities: Beyond annotations, can you resize, crop, and adjust the screenshot itself within the tool?
Collaboration Features: If you're working with a team, look for simultaneous editing, commenting, and feedback sharing.
Integration With Other Tools: Seamless integration with project management or communication platforms can really streamline your workflow.
Output Formats: Make sure the tool supports the formats you need, like PNG, JPG, PDF, or even GIF creation.
Evaluating Tools Based on Workflow
Consider how you’ll actually be using annotated screenshots. A UX designer providing visual feedback needs different tools than a technical writer creating software documentation. Check out our guide on all blog posts for more workflow tips.
Quick Markups: For basic annotations, built-in tools or lightweight extensions might be sufficient.
Detailed Explanations: If you're creating comprehensive guides, tools with robust text editing and formatting are essential.
Visual Feedback: For team projects, collaborative annotation platforms with commenting and feedback features are key.
Visual communication is increasingly important in customer service. Here are some helpful visual support strategies. This underscores the growing importance of clear visuals.

To help you choose the right tool, we've compiled a comparison table of popular screenshot annotation tools.
To help you choose the right tool, we've put together a comparison table highlighting the key features, pricing, and platform availability of top screenshot annotation tools.
Screenshot Annotation Tools Comparison:
Tool Name | Platforms | Key Features | Price | Best For |
|---|---|---|---|---|
macOS, iOS, Android, Windows | Basic shapes, arrows, text, blurring | Free | Quick markups, simple annotations | |
Windows, macOS | Advanced editing, screen recording, GIF creation | Paid | Creating tutorials, detailed documentation | |
Web, Desktop app | Collaborative annotation, sharing, feedback tools | Freemium | Team projects, visual feedback | |
macOS, Windows, Chrome extension | Screen recording, GIF creation, cloud storage | Freemium | Sharing quick screen recordings, GIFs | |
Windows, macOS, Chrome, Firefox, IE, Opera | Simple screenshot tool with basic editing features | Free | Quick screenshots and basic edits |
This table gives you a quick overview of some popular options. Remember to consider your specific needs when making your final decision.
Building an Annotation System for Consistency
Leading organizations often develop internal annotation standards for consistency and efficiency. This involves setting guidelines for:
Annotation Styles: Define preferred colors, shapes, and fonts for different annotation types.
Terminology: Create a consistent vocabulary for annotations to avoid any confusion.
Workflow Processes: Establish clear procedures for capturing, annotating, and sharing screenshots.
This investment in standardized systems saves time and improves communication. The market for data annotation tools is growing rapidly, with a projected CAGR of 26.5% from 2025 to 2033. You can find more information about this growth in the data annotation tool market. This highlights the increasing importance of tools that enhance visual communication. Choosing the right annotation tool is a smart move for both individual productivity and organizational success.
Annotate a Screenshot Like a Professional: Step-by-Step
Turning a basic screenshot into a powerful visual aid involves more than just adding random markings. It's about communicating clearly and effectively. Let's explore how professionals use a step-by-step method to annotate screenshots for maximum impact.
Planning Your Annotations: A Critical First Step
Before you even hit that print screen button, think about the message you want to send. What are the key takeaways? What details need to be highlighted? This pre-planning is essential for creating effective annotations that align with your communication goals.
Capturing the Perfect Screenshot: Setting the Stage
Choosing the right capture method is crucial. For full-page screenshots, tools like GoFullPage or your browser's developer tools are excellent choices. For specific areas, the built-in snipping tool or your annotation software's selection features will do the trick. This ensures you have the right base for your annotations.
Choosing the Right Annotation Tools: A Matter of Precision
Arrows guide the viewer's eye. Highlights emphasize important text. Text boxes offer further explanations. Shapes, like circles or rectangles, group related elements. The right combination of these tools transforms simple markups into professional visuals.
Step-by-Step Annotation Process: From Capture to Clarity
Capture: Grab a clean, high-resolution screenshot of the relevant area.
Prepare: Crop the image to remove any unnecessary distractions and focus on the key content.
Annotate: Strategically add your chosen elements (arrows, highlights, text). Maintain a consistent style for a professional look.
Review: Take a step back and evaluate your work. Does it clearly communicate your message? Is it visually appealing and easy to understand?
Refine: Make any necessary adjustments. This might involve repositioning elements, tweaking colors, or adding more annotations.
Organizing Complex Annotations: Mastering Multi-Step Processes
Numbered callouts are indispensable for explaining multi-step processes. Imagine illustrating a software workflow. Numbered steps, paired with corresponding annotations on the screenshot, guide the viewer through each stage. This structured approach minimizes confusion, especially for complex tasks.
Context is Key: Providing Clear and Concise Explanations
Visuals are powerful, but context is crucial. Don't just point; explain. Use concise text boxes to clarify the meaning of each annotation. It's like adding captions to a photo, providing the viewer with the necessary information. This adds clarity and makes information instantly digestible. For more helpful tips and insights, check out the Beep blog, a great resource for teams looking to improve collaboration. You can also find more information on their sitemap and dynamic reviews. These resources offer valuable information on boosting communication and project management, further enhancing your annotation skills.
Elevating Your Screenshot Annotations to Expert Level
Annotating a screenshot effectively isn't just about adding arrows and boxes. It's about using design principles to turn a static image into a dynamic communication tool. This involves considering how visual hierarchy, color psychology, and typography affect how your annotations are perceived.
Mastering Visual Hierarchy: Guiding the Viewer's Eye
Visual hierarchy directs the viewer's attention to the most important parts of your screenshot first. Think of it as a roadmap. Use size, color, and contrast to highlight key areas. For example, a large, bright arrow pointing to an important button will stand out more than smaller annotations. This lets you control the flow of information and ensure clarity.
The Psychology of Color: Evoking the Right Emotions
Color isn't just decorative; it impacts emotions and interpretations. Green often signals positive actions, while red highlights errors or warnings. Using color strategically adds a layer of meaning to your annotations and enhances communication. This careful color coding quickly conveys the purpose of different elements within the screenshot.
Typography for Annotations: Clarity and Readability
The font and size you choose for your annotations greatly affect readability. A clear, easy-to-read font ensures your message is accessible. Consistent font styles and sizes create a professional and cohesive look. This attention to detail elevates your communication. The growing importance of data annotation is reflected in the market's expansion. The global data collection and labeling market is expected to reach $29.2 billion by 2032, a significant increase from $3.0 billion in 2023. Find more detailed statistics here.
Building Scalable Annotation Systems

For large projects, an annotation system ensures consistency and saves time. This means establishing guidelines for:
Color palettes: Define specific colors for different annotation types.
Annotation shapes: Standardize the use of arrows, boxes, and other shapes.
Font styles: Choose a consistent font and size for all text.
This systematic approach improves clarity and streamlines the process, resulting in faster production and a more professional product.
Sequential Annotations for Complex Processes
Explaining complex processes requires a structured approach. Sequential annotations, using numbered steps or a clear visual flow, simplify complex information. It's like creating a guided tour through your screenshot, reducing cognitive load and improving understanding, especially for multi-step tasks.
Accessibility Considerations: Expanding Your Reach
Accessible annotations ensure everyone understands your message. Sufficient color contrast between annotations and the background improves readability for users with visual impairments. Providing alternative text descriptions for images benefits screen reader users. These considerations broaden the usability of your annotated screenshots. This inclusive approach is crucial for effective communication.
Avoiding the Annotation Mistakes That Undermine Clarity
Even seasoned professionals can sometimes make annotation errors that hinder clear communication. By comparing ineffective annotations with those done well, we can identify these pitfalls and learn how to fix them. This will help you annotate a screenshot with precision and impact.
The Problem of Overcrowding
The most common mistake is overcrowding. Too many annotations create visual clutter and cognitive overload, defeating the purpose of annotation entirely. It's like trying to read a map covered in scribbles – the important information gets lost in the noise.
Inconsistent Styling: A Credibility Killer
Inconsistent styling, such as varying arrow thicknesses, font sizes, or color choices, confuses viewers and diminishes your professional image. Imagine a presentation with mismatched fonts and colors – it looks unprofessional and undermines the message. Maintain a consistent style guide for your annotations to ensure a polished and credible look.
Poor Contrast and Context: The Clarity Killers
Poor contrast between annotations and the background makes them difficult to read, especially for viewers with visual impairments. Equally problematic is inadequate context. Annotations should explain why something is important, not just what it is. A simple arrow pointing to a button without explanation leaves the viewer wondering about its function.
This infographic compares the number of annotation features across three popular tools.
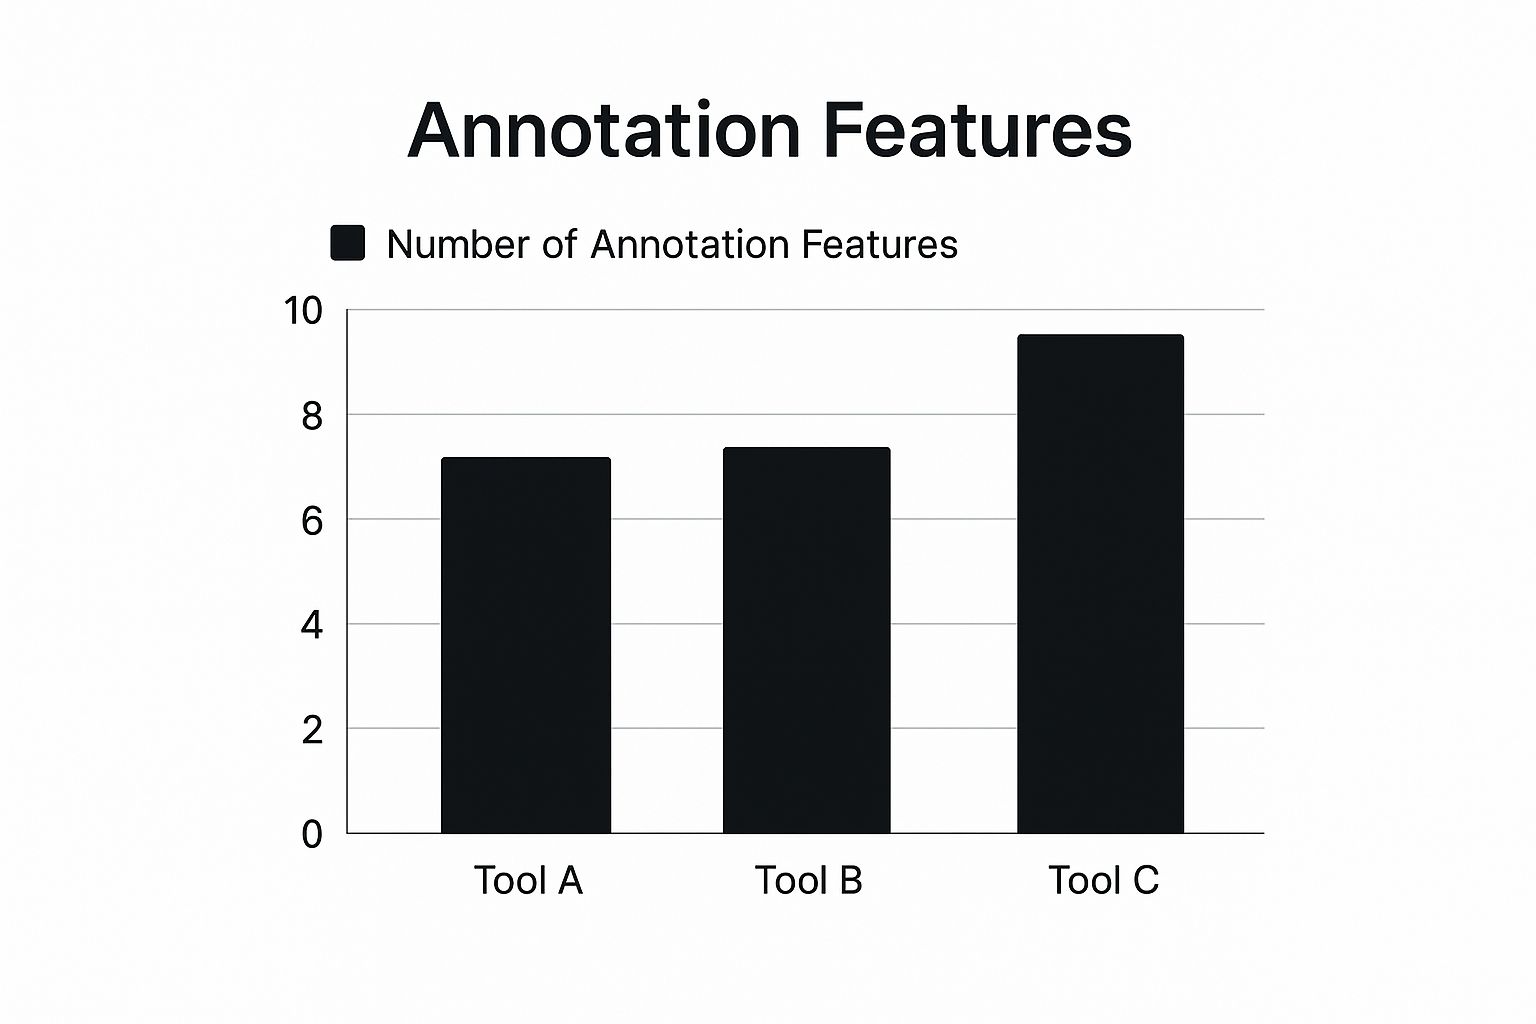
As the infographic illustrates, Tool C offers the most comprehensive feature set, while Tool B provides fewer options. You might be interested in: reviews of annotation software to further research which tools best fit your needs. Selecting the right tool is the first step towards creating clear and effective annotations.
Solutions for Common Annotation Errors
The following table summarizes common screenshot annotation mistakes and provides solutions for improving visual communication:
Screenshot Annotation Mistakes and Solutions Common annotation errors and practical ways to fix them for better visual communication
Common Mistake | Why It's Problematic | How to Fix It | Before/After Impact |
|---|---|---|---|
Overcrowding | Creates visual clutter and makes it difficult to focus on key information. | Prioritize the most important elements and group related items with shapes. Use a clear visual hierarchy. | Improved focus and clarity. Less overwhelming for the viewer. |
Inconsistent Styling | Appears unprofessional and can confuse the viewer. | Create a style guide with a limited color palette, consistent font sizes, and arrow styles. Use tools like Figma or Adobe Photoshop to help maintain consistency. | A more professional and polished look, increasing credibility. |
Poor Contrast | Reduces readability, especially for those with visual impairments. | Choose colors that stand out against the background. Test annotations on different devices. | Increased accessibility and readability. |
Inadequate Context | Fails to explain the why behind the what, leaving the viewer guessing. | Add concise text explanations for each annotation, clearly stating its purpose and relevance. Consider using numbered callouts to connect annotations to descriptions. | Enhanced understanding and a more informative experience for the viewer. |
By avoiding these common mistakes and applying these solutions, your annotations will become powerful communication tools. Clear, concise, and well-styled annotations enhance understanding and elevate your professional image. This ensures your message is received clearly and effectively.
Leveraging Annotated Screenshots for Business Impact
Annotated screenshots aren't just about making things clearer. They can seriously boost your business results across different departments. Let's explore how smart annotation helps leading organizations cut support costs, improve onboarding, and build better customer relationships.
Streamlining Technical Support: Faster Resolutions, Happier Customers
Tech support teams often wrestle with tricky issues that are hard to explain with just words. Annotated screenshots provide a visual guide, quickly highlighting the problem. This means faster solutions and happier customers.
By using clear visuals, support teams can guide users through troubleshooting, reducing back-and-forth emails and calls. Check out Beep's dynamic use cases for more ideas on streamlining workflows. Some companies have even seen resolution times drop by up to 37% after implementing standardized annotation practices. This efficiency translates into lower support costs and greater customer loyalty.
Enhancing Product Onboarding: Simplifying the User Journey
Introducing new users to a product can be tough. Annotated screenshots simplify onboarding with visual guides and step-by-step instructions. Instead of dense text, product teams can use annotated screenshots to showcase features and how they work.
This visual approach speeds up the learning process and leads to faster feature adoption. It also cuts down on extensive training materials, saving time and resources. This makes onboarding engaging and user-friendly, improving user retention rates.
Empowering Marketing and Sales: Communicating Value Effectively
Annotated screenshots are powerful tools for marketing and sales. They create compelling materials that clearly communicate product value. Highlighting key features with annotations in sales presentations or on landing pages can increase conversion rates.
This helps potential customers quickly understand the benefits, driving sales and boosting brand perception. Visuals make your marketing messages more memorable and impactful.
Building Stronger Customer Relationships: Fostering Transparency and Trust
Using annotated screenshots builds transparency and trust with customers. Clear visual communication removes confusion and ensures everyone is on the same page. Whether it's tech support, onboarding, or marketing, annotated screenshots create a shared understanding, strengthening customer relationships. This visual approach makes communication more personal and accessible, leading to increased customer satisfaction.