
.png)
A Practical Website Development Timeline Template
- shems sheikh
- Nov 25, 2025
- 13 min read

A solid website development timeline template is so much more than a list of dates. Think of it as the strategic roadmap that keeps your project from going off the rails. It takes a complex, often chaotic process and breaks it down into predictable steps, making sure everyone—from stakeholders to developers—is on the same page and chasing the same goal.
Why a Timeline Is Your Most Important Tool
I like to think of a website development timeline as the project's single source of truth. Without it, even the most promising projects can quickly descend into chaos, plagued by missed deadlines, blown budgets, and seriously frustrated teams. A well-structured timeline is really the difference between a smooth launch and a stressful, last-minute scramble.
It plays a few critical roles that set you up for success right from the very beginning.
Aligning Expectations and Reality
One of the timeline's most important jobs is to line up what the client expects with the practical realities of development. It gives a clear, visual answer to that all-important question, "When will it be done?" and shows exactly what has to happen to get there.
This kind of transparency builds trust and nips misunderstandings in the bud. When stakeholders can actually see the dependencies and the effort needed for each phase, they get a much better appreciation for the process. If you want to dive deeper into structuring these projects, our guide on a winning blueprint for project management in website development offers some great insights.
A visual tool like a Gantt chart lays out task durations and dependencies so clearly.
This chart shows how something like "Market Research" has to be finished before "Software Development" can even start, illustrating the project's critical path perfectly.
Preventing Scope Creep
Ah, scope creep—the slow, uncontrolled expansion of project requirements. It's a notorious budget killer. A detailed timeline is your best defense because it defines the project's boundaries right from the start. When a new feature request pops up, you can immediately see how it will affect the schedule.
A timeline forces a crucial conversation: "We can definitely add that feature, but it will push our launch date back by two weeks. Is that a trade-off we're willing to make?" This reframes scope changes from casual "can-we-just-adds" to strategic decisions with real consequences.
The way web technologies have evolved has also massively influenced project schedules. These days, the average timeline for a small business website is about 4 to 8 weeks—a huge reduction from years past, all thanks to more efficient tools and processes.
Mapping Out the Core Web Development Phases
Every single successful website project I've been a part of has followed a clear, predictable path. Getting a handle on these core stages is the key to building a realistic timeline that doesn't fall apart at the first hurdle. Each phase has its own goals, its own key players, and specific things you need to have in hand before you can move on to the next. It’s a logical flow from a simple idea to a fully functioning website.
This visual really nails how a solid timeline can steer a project clear of common nightmares like scope creep. It’s all about aligning expectations and paving a smooth road to a successful launch.
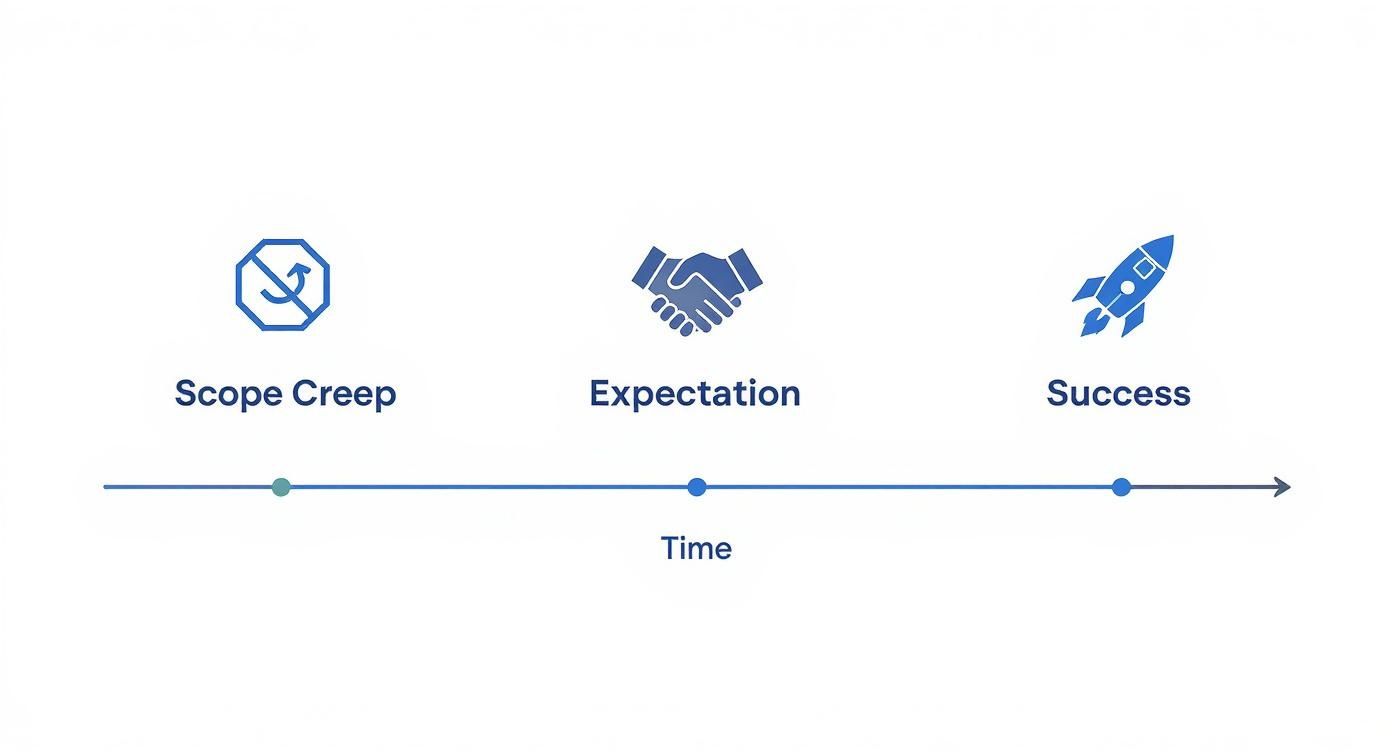
Think of your timeline as more than just a schedule. It's your strategic playbook for managing risks and keeping everyone on the same page.
Strategy and Planning
This is where it all begins—the discovery phase. Before a single line of code is written or a pixel is pushed, you have to define what "done" and "successful" actually look like. This means talking to stakeholders, snooping on the competition, and setting clear Key Performance Indicators (KPIs).
The main goal here is to produce the foundational documents that will guide the entire project. You'll walk away with:
A Project Brief: The 10,000-foot view. It covers the project's goals, budget, and scope.
A Sitemap: Think of this as the architectural blueprint for the website, showing how all the pages connect.
User Personas: These are your imaginary friends—fictional profiles of your ideal users that help guide every design and content choice you make.
Design and Content Creation
Once the plan is locked in, things get visual. The UI/UX design team jumps in, starting with wireframes—super basic blueprints of page layouts. From there, they build up to high-fidelity mockups that look and feel like the finished product.
At the same time, content creation needs to get rolling. Seriously, don't sleep on this. It’s one of the most common bottlenecks I've seen. Getting all the text, images, and videos gathered and optimized early means the development team can work with the real deal, not lorem ipsum that can mess up layouts down the line.
Performance isn't an afterthought. Weaving in key website performance optimization techniques from the very beginning ensures the site is fast and user-friendly. This has to be a consideration during both design and development.
Development and Testing
Now for the fun part: bringing the designs to life. The dev team typically splits this work into two streams:
Front-End Development: This is all the stuff users see and click on. It’s built with languages like HTML, CSS, and JavaScript.
Back-End Development: This is the engine under the hood—the server, the database, and all the logic that makes the site actually work.
After the first build is ready, it's handed over to the Quality Assurance (QA) team. They are the bug hunters. They’ll test the site on every browser and device imaginable, looking for anything broken or clunky. This step is absolutely critical for shipping a polished, professional product. If you want a deeper dive, we have a whole guide on managing web development projects from start to finish.
Launch and Post-Launch
The big day! Once the site gets the green light from QA and final sign-off from stakeholders, it's time to go live. This means moving the site to the live server and running one last set of checks.
But the job isn't done. The post-launch phase is for monitoring performance, squashing any surprise bugs that pop up, and training the client on how to use their new digital home.
Of course, for simpler projects, website builders have really shaken things up. It’s estimated that by 2025, over 50% of new websites will be created on these platforms. A basic site can go from concept to launch in just a few days, which shows just how much the game is changing.
How to Make the Website Timeline Template Your Own
A downloadable website development timeline template is a fantastic starting point, but it's just that—a start. If you treat it like a rigid, one-size-fits-all plan, you're pretty much guaranteed to run into trouble. The real magic happens when you adapt it to the unique scope and rhythm of your specific project.
This whole process is about turning those broad phases into a granular, actionable to-do list that leaves zero room for guesswork. A generic template gives you the bones; your job is to add the muscle and sinew that make it a reliable guide for your team and clients.
Break Down Phases into Concrete Tasks
First thing's first: you have to deconstruct the high-level phases. "UI Design" isn't a task; it's a milestone. To make it manageable, you need to break it down into smaller, concrete actions. I've learned from experience that this detailed approach is what transforms a vague plan into a predictable process.
Take that "UI Design" phase, for instance. It could be broken down into:
Create Mood Board: Gather visual inspiration and pin down the aesthetic direction.
Develop Wireframes for Key Pages: Focus on layout and user flow before anyone gets distracted by colors or fonts.
Design Homepage Mockup (Desktop & Mobile): Create a high-fidelity design for the most important page.
Present Mockup & Gather Feedback: Schedule a specific review session with the client.
Iterate on Homepage Design: Implement that first round of revisions.
By doing this for every major phase—from discovery all the way to deployment—you create a super-detailed checklist. It clarifies exactly what needs to be done and when, making the entire project feel way less intimidating and much easier to track.
Estimate Durations and Assign Ownership
Now that you have a list of specific tasks, you can start estimating how long each one will take. Be brutally realistic here. If you've never built a certain integration before, don't pretend it'll take the same amount of time as a routine job. Do a little research on average times and then add a buffer.
A critical mistake I see teams make all the time is underestimating the "soft" tasks. Client feedback cycles and internal reviews aren't instantaneous. You have to schedule dedicated time for them in your timeline—treat them like real tasks with start and end dates.
Next up, assign a clear owner to every single task. Seriously, this part is non-negotiable. When someone is directly responsible for a task, it's far more likely to get done on time. This also makes communication a breeze; if a task is falling behind, everyone knows exactly who to talk to.
Build in Buffers for the Unexpected
Let's be real: no project ever goes exactly according to plan. Client feedback takes longer than you thought, a key team member gets sick, or you uncover some gnarly technical debt you didn't know existed. A resilient timeline anticipates these hiccups.
I always recommend building a 15-20% buffer into your timeline for each major phase. This isn't just "padding" for the sake of it; it's a realistic acknowledgment that stuff happens. This buffer gives you the flexibility to handle minor delays without blowing up the entire project schedule.
It's also a great idea to schedule dedicated "catch-up" days between major milestones. For example, add a two-day buffer after the development phase is technically "done" but before QA testing officially kicks off. This creates a safety net to absorb small delays and ensures the next phase can start on solid ground. This approach turns your website timeline from a fragile wish list into a robust, practical tool that actually works in the real world.
Real-World Timeline Examples
Theory is great, but let's be honest—seeing how timelines play out in the real world is what really makes things click. To give you a better feel for how scope blows up a schedule, I'm going to walk you through three projects I see all the time: a small brochure site, a mid-sized e-commerce store, and a big custom web application.
Think of these as benchmarks. You can use them to get a gut check on where your own project might fall on the spectrum.

As you can see, a simple project can be in and out the door quickly. But once you add complexity, you have to bake in a lot more time for the tricky bits like development and testing.
Sample Website Development Timelines by Project Size
To make this even clearer, let's break down how the time investment shifts across these three project types. Notice how phases like "Development" and "Testing" expand dramatically as the scope grows.
Development Phase | Small Brochure Site (4 Weeks) | Medium E-Commerce Site (10 Weeks) | Large Custom App (20+ Weeks) |
|---|---|---|---|
Discovery & Planning | 1 Week | 2 Weeks | 4-6 Weeks |
UI/UX Design | (Part of Week 1) | 2 Weeks | 4-6 Weeks |
Development | 2 Weeks | 4 Weeks | 10+ Weeks (Sprints) |
Testing & QA | 1 Week | 2 Weeks | 2-4 Weeks |
Launch & Deployment | (Part of Week 4) | (Part of Week 10) | (Part of final weeks) |
This table gives you a high-level view, but keep in mind these are just estimates. A single tricky integration or a slow feedback loop can easily add weeks to any of these timelines. Now, let's dig into what actually happens during those weeks.
A Small Brochure Website: The 4-Week Sprint
A small brochure site is all about getting a professional presence online, fast. We're talking 5-7 pages—think Home, About, Services, Contact—with a laser focus on clear messaging and solid branding. The timeline here is tight and moves quickly.
Week 1: Discovery & Design: This first week is an absolute whirlwind. It kicks off with a strategy session to nail down goals, you gather all the content, and the design team hustles from wireframes straight to a final homepage mockup for you to sign off on.
Weeks 2-3: Development: With the design approved, it's all hands on deck for coding. The goal is a fully functional, responsive website. Since there are no complex integrations, a good developer can hammer this out pretty quickly.
Week 4: Testing & Launch: The home stretch. This week is dedicated to quality assurance (QA), plugging in the final content, and getting it all deployed. The client gets one final look-over before we push the big red "launch" button.
This breakneck pace is possible thanks to modern tools. Cloud-based platforms have seriously compressed schedules, with the average launch time for sites on a cloud CMS now sitting between 2 to 6 weeks. These platforms are also incredibly reliable; a whopping 90% of businesses report better performance and uptime. If you want to dive deeper into these trends, check out this insightful web development timeline analysis.
A Medium E-Commerce Store: The 10-Week Build
Selling stuff online changes the game completely. An e-commerce project has all the elements of a brochure site, but then you pile on secure payment processing, product catalogs, inventory, and customer accounts.
The biggest time-sinks here are always integration and testing. You absolutely cannot rush setting up a payment gateway or locking down user accounts. Those areas demand painstaking attention to detail to protect the business and its customers. It's just not worth cutting corners.
You can see how the phases start to stretch:
Discovery & Planning (2 Weeks): This requires a much deeper strategic dive. We have to map out product categories, shipping rules, and tax configurations before a single pixel is designed.
UI/UX Design (2 Weeks): Designing the checkout flow and product pages is a make-or-break step. It needs careful thought about the user experience to avoid abandoned carts.
Development (4 Weeks): This is where the real heavy lifting happens. We're integrating the e-commerce platform (Shopify, BigCommerce, etc.), connecting payment gateways, and hooking up any third-party inventory systems.
Testing & Launch (2 Weeks): QA is way more intense. Testers have to run through the entire purchase flow over and over—from adding an item to the cart all the way to getting an order confirmation email.
A Large Custom Web Application: The 20+ Week Marathon
When you're building a custom web app, you're creating something from scratch to solve a very specific business problem. Think of tools like a project management system, a custom CRM, or a unique booking platform. The timeline here is long and almost always follows an agile approach with multiple development sprints.
Here, the phases are far more intensive:
Discovery (4-6 Weeks): This isn't just a meeting or two; it's a deep dive. It involves extensive user interviews, writing up detailed technical specs, and creating a rock-solid project scope document.
Design & Prototyping (4-6 Weeks): Designers don't just create static mockups. They build interactive prototypes that are then rigorously tested with real users to make sure the concept actually works before a line of code is written.
Development Sprints (10+ Weeks): Development gets broken down into bite-sized chunks, usually two-week "sprints." In each sprint, a small batch of features is built, tested, and demonstrated, allowing for continuous feedback and adjustments.
QA & Deployment (2-4 Weeks): This final phase involves extensive user acceptance testing (UAT), security audits to find vulnerabilities, and a meticulously planned deployment strategy to ensure a smooth launch.
Look, even the most beautifully crafted project timeline is going to hit some turbulence. It’s just the nature of the beast. The real secret isn't about creating some perfect, unbreakable plan, but building a resilient one that already anticipates the common roadblocks. When you know what usually goes wrong, you can get ahead of it and stop small delays from derailing the entire project.
In my experience, the three biggest culprits are scope creep, feedback delays, and surprise technical debt. Each one can poison a schedule, quietly pushing deadlines back week by week. But with a bit of foresight, you can totally neutralize their impact and keep things moving.
Taming Scope Creep
Scope creep is the silent project killer. It starts with small, harmless-sounding requests that slowly, but surely, expand the project's boundaries. A simple "can we just add..." feels minor on its own, but a dozen of those will completely blow up your timeline and your budget.
Your best defense? A formal change request process.
This isn’t about saying "no" to new ideas. It's about forcing a strategic conversation around every single one. When a new feature is requested, it gets formally documented, we estimate the work, and then present its impact on the timeline to the stakeholders. This transforms a casual request into a conscious business decision. You can learn more about these tactics in our complete guide on how to avoid scope creep and keep your project focused.
Conquering Feedback Delays
Waiting on client feedback is another classic bottleneck. I’ve seen projects grind to a halt for days—sometimes weeks—just because a key stakeholder was unavailable for a review. To get around this, you have to treat feedback cycles like official tasks in your project plan.
Schedule Review Meetings: Don't just fire off an email and hope for the best. Book specific times for design presentations and feedback sessions. Get it on the calendar.
Set Clear Deadlines: Let everyone know exactly when you need their feedback to keep the project on schedule. Be polite but firm about the deadline's importance.
Use Visual Tools: This is a big one. Platforms like Beep are a lifesaver here. They let stakeholders leave comments directly on a live webpage, capturing precise feedback instantly. It completely cuts down on those confusing, novel-length email chains.
Getting ahead of potential issues by implementing effective software project risk management strategies can make a huge difference in navigating these common delays. When you plan for these risks from the start, you're essentially creating a buffer that protects your launch date from the inevitable bumps in the road.
Got a few lingering questions about building a website development timeline? No problem. I've been there. Let's tackle some of the most common head-scratchers I hear from project managers and agency owners.
How Do I Estimate Time for Unfamiliar Tasks?
Ah, the classic "how long will this take if I've never done it before?" question. It's a tough spot, but you're not flying completely blind. Your first move is to do some quick, focused research. Hit up developer forums or read a few industry articles to find a ballpark time range for the task.
Once you have a rough idea, pad it out. Seriously. Add a 25-30% buffer to whatever your best guess is. This isn't about being pessimistic; it’s about being realistic. You need to account for the learning curve and the little snags that always pop up with something new. Trust me, it's far better to tell a client you've built in some learning time upfront than it is to miss a deadline you were too optimistic about.
What Is the Biggest Mistake in Project Timelines?
This one's easy, and I see it happen all the time. The single most damaging mistake is completely forgetting to schedule time for anything that isn't pure design or code. Project managers will map out every technical task down to the minute but leave out huge chunks of the actual process, like client feedback, content gathering, or internal reviews.
These "in-between" phases are where projects truly live or die. A realistic timeline treats client feedback and stakeholder approvals as official, non-negotiable tasks with their own deadlines. They aren't an afterthought; they're a core part of the workflow.
When you fail to block out time for the human element of a project, the whole schedule starts to crumble. It creates a domino effect that pushes every single milestone back.
Should My Website Timeline Be Fixed or Flexible?
Your best bet is to treat your timeline as a living, breathing document. Think of it as a roadmap, not a set of concrete commandments. It’s there to provide structure and a clear path forward, but it has to be able to bend without breaking when reality hits.
I recommend reviewing and adjusting it regularly—a weekly check-in is a great rhythm to get into. You'll want to update it based on the actual progress you’re making and any scope changes the client has approved. Using a project management tool makes this a breeze because it can automatically show you how a delay in one area will ripple through the rest of the schedule. This keeps everyone, from your team to your client, on the same page about the project's real-time status and the new target launch date.
Stop chasing feedback through endless email chains and messy spreadsheets. With Beep, your team and clients can drop visual comments right on the live website, which instantly become trackable tasks. It's the simplest way to streamline your review cycles and get projects across the finish line faster. Get started for free at https://www.justbeepit.com.
That's a practical timeline—breaks down the chaos of web projects nicely. Having a clear roadmap really helps manage expectations. I've seen too many projects derail when support channels fail mid-launch, which is why I always keep resources like https://jacquie-lawson.pissedconsumer.com/customer-service.html handy just in case something goes sideways.