
.png)
Picture Annotation Software: A Practical Guide for Faster AI Workflows
- shems sheikh
- Dec 14, 2025
- 17 min read

So, what exactly is picture annotation software?
Think of it as a special set of tools for adding notes, labels, and all sorts of helpful information directly onto images. It’s the magic behind how a self-driving car learns to spot a stop sign, but it's also the secret sauce that helps a remote design team give super-clear feedback on a new website layout.
This software is basically the bridge that connects what we see in a picture to actual, usable information.
Unpacking the Power of Picture Annotation
At its core, picture annotation software is a digital canvas loaded with specialized tools. Imagine you're trying to teach a toddler what a "car" is. You wouldn't just describe it verbally, right? You'd point to different cars in a picture book, over and over, saying "car."
That's pretty much what this software does—just for machines and professional teams, and on a massive scale.
For the world of artificial intelligence, these tools are used to create the "picture books"—huge datasets of labeled images—that train computer vision models. An annotator might draw a box around every single car in a street-view photo and slap a "car" label on it. After seeing thousands of these examples, the AI model starts to recognize cars all on its own.
But for human teams, the software has a totally different, yet equally powerful, job. It's less about training an algorithm and more about making communication crystal clear.
For Designers: Instead of a vague email, a stakeholder can drop a pin right on a mockup and write, "This button color needs way more contrast." Problem solved.
For Developers: A QA tester can circle a bug on a screenshot, tag the right engineer, and show them exactly what's broken without a wall of text.
For Marketers: The whole team can comment on ad creatives, pointing out which parts are working or suggesting tweaks to make a campaign pop.
The Two Sides of Annotation
This dual purpose—powering AI and making teamwork smoother—is what makes picture annotation tools so incredibly versatile.
On one hand, they are a fundamental building block of the AI revolution, driving everything from medical imaging analysis to those futuristic automated checkout systems in stores. The market is exploding because of it. The global data annotation tools market hit USD 518.47 million in 2023 and is set to grow like crazy as everyone scrambles for high-quality labeled data. If you're curious, you can read more about this trend and the top image annotation tools making it happen.
On the other hand, it's a down-to-earth communication tool that fixes everyday business headaches. It kills confusing email chains and endless video calls, replacing them with clear, visual feedback that has all the context you need.
The image below gives you a peek into the AI training side of things, showing how different annotation types like bounding boxes are used to label objects for a computer vision model.
This process of adding structured data to images is what turns a simple picture into a goldmine for machine learning. Whether you're building the next big thing in AI or just trying to make sure a design change is understood, picture annotation software is what translates visual ideas into clear, actionable instructions.
To give you a clearer picture, let's quickly break down the main jobs these tools handle.
Core Functions of Picture Annotation Software at a Glance
Core Function | Description | Example Application |
|---|---|---|
Data Labeling | Attaching metadata (labels, tags) to specific objects or regions within an image. | Drawing a bounding box around every pedestrian in a street photo and labeling it "person" to train a self-driving car's AI. |
Visual Feedback | Adding comments, shapes, and pointers to an image to communicate ideas or issues. | A product manager circling a confusing icon on a screenshot of a new app and asking the UX designer to revise it. |
Quality Assurance | Highlighting visual bugs, inconsistencies, or defects directly on a screenshot of a website or application. | A QA tester drawing an arrow to a misaligned button on a webpage and assigning the task to a developer for a quick fix. |
Collaborative Review | Enabling multiple team members to comment and discuss visual assets in a shared, centralized space. | A marketing team leaving notes on a new ad creative, discussing which headline and image combination is most effective. |
As you can see, the applications are incredibly broad, but they all boil down to one thing: adding a layer of clear, contextual meaning to images.
Exploring Core Features and Annotation Types
Let's pull back the curtain on picture annotation software and see what really makes it tick. At its core, this kind of software is all about a powerful toolkit designed for one thing: adding crystal-clear context to images. The different types of annotation are the fundamental building blocks that let us turn a simple picture into structured data or actionable feedback.
Think of it like having a set of specialized drawing tools. You wouldn't use a thick paintbrush to draw a perfect square, and you wouldn't grab a ruler to paint a fluffy cloud. It’s the same idea here. Picking the right annotation tool is everything, whether you're meticulously training a complex AI model or just leaving some quick design notes for your team.
The Essential Annotation Toolkit
The most common and straightforward tool in the box is the bounding box. It's just a simple rectangle drawn around an object. This method is incredibly fast and efficient for flagging the general location and size of things, which is why it's a go-to for object detection models that need to find stuff like cars in a street view, faces in a crowd, or products on a shelf.
But sometimes, a simple box just won't cut it. That's when we get into more detailed methods:
Polygons: For anything with a weird or irregular shape, polygons give you much more precision. An annotator clicks a series of points around an object’s edge to trace its exact outline. This is absolutely vital when the specific shape and contour are important.
Keypoints (or Landmark Annotation): This is all about placing specific dots on key features of an object. It’s used to capture fine details, like the corners of a person's eyes and mouth for facial recognition or the joints of a body for estimating someone's pose.
Semantic Segmentation: This is probably the most detailed form of annotation you can do. Instead of just drawing an outline, this technique assigns a category label—like "road," "sky," "building," or "pedestrian"—to every single pixel in an image. The result is a pixel-perfect map that gives an AI an incredibly rich understanding of a scene.
These different annotation types are game-changers across various industries. Medical imaging tools, for instance, rely on precise polygon annotations to identify tumors, while security systems use simple bounding boxes to track vehicles. And semantic segmentation? It's critical for self-driving cars, helping them identify pedestrians with up to 98% precision.
It's no surprise that as of 2024, image and video annotation tasks took up a massive 41.6% of the entire AI annotation market. They power applications like retail analytics that can boost shopper behavior tracking accuracy by 85%. You can discover more data annotation market insights here.
Beyond the Drawing Board: Workflow Features
While the annotation types are the "what," the workflow features are the "how." What separates a basic tool from a professional platform isn't just the drawing part—it's how smoothly it manages the entire process from start to finish.
A huge one is AI-assisted labeling. This uses an existing AI model to make a first pass at the annotations, which a human can then quickly check and fix. It's a massive time-saver, turning what used to be a tedious manual job into a much faster supervisory role.
"Your choice of annotation tool for use in your computer vision projects has a big impact. The more efficient you are in your annotation tool – and the more productive the tool makes you – the quicker you can get to your end goal."
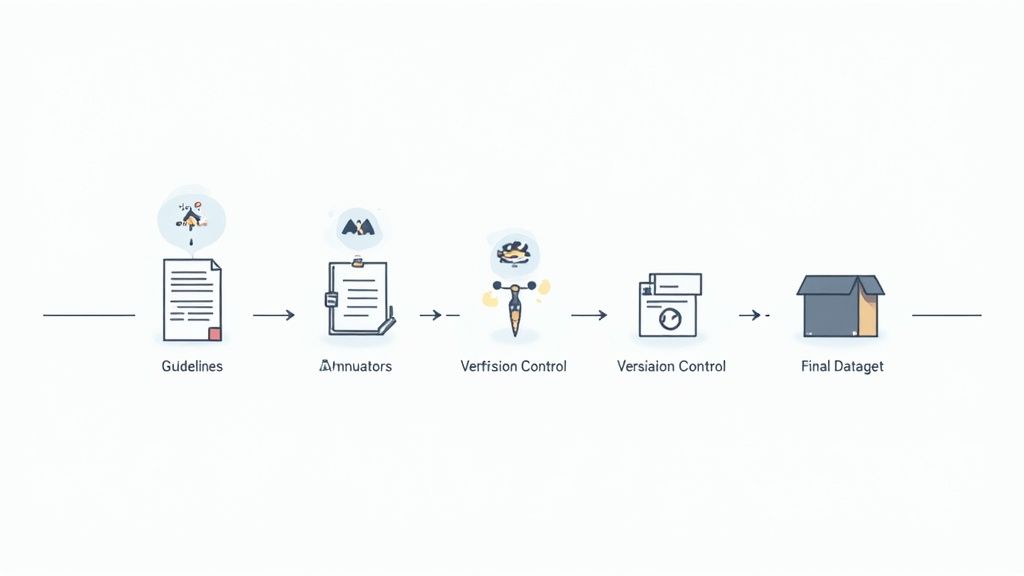
This is where you see how annotation becomes the central hub connecting AI training with collaborative team feedback.

As the diagram shows, whether it's for machine learning or just clear communication, annotation is what makes raw images truly useful. Other workflow features that make this happen include solid quality control loops, which let you set up multiple review stages to keep everything accurate and consistent.
Finally, effective version control is an absolute must-have. Just like with code, datasets change and evolve. You need a system to track changes, roll back to previous versions, and manage different sets of annotations. It prevents disasters and makes sure all your work is traceable. These features all work together to create a system that’s built for accuracy, speed, and scalability.
How Different Teams Use Picture Annotation Software
Picture annotation software might bring to mind complex AI projects, but its real power is in how versatile it is. This isn't just a tool for data scientists in a lab; it's a communication powerhouse that solves everyday problems for all kinds of teams. By turning simple images into interactive canvases, this software tears down communication walls, making collaboration visual, intuitive, and way more efficient.

This isn't just a niche trend, either. The market is booming. The global AI annotation market hit a whopping USD 1.96 billion in 2024, and guess what? Image data annotation is leading the charge with a 34.70% share. This growth isn't just about big tech; it's fueled by countless teams like yours finding practical ways to get work done smarter.
The table below breaks down exactly how different roles tap into these tools, solving unique problems along the way.
Table: Role-Based Benefits of Picture Annotation Software
Professional Role | Primary Use Case | Key Benefit |
|---|---|---|
Developer/QA Tester | Reporting visual bugs and UI glitches with precise on-screen callouts. | Drastically reduces ambiguity and accelerates the debugging cycle. |
UX/UI Designer | Gathering contextual feedback on wireframes and mockups from stakeholders. | Keeps all design feedback organized and tied directly to the visual element. |
Product Manager | Communicating feature requirements and changes visually to the team. | Ensures everyone is aligned, reducing misunderstandings and rework. |
Marketing Manager | Reviewing and approving creative assets like social media graphics and ads. | Streamlines the creative approval process and ensures brand consistency. |
Remote Team Member | Overcoming communication barriers when text or video calls aren't enough. | Provides a clear, asynchronous way to discuss visual information. |
As you can see, the applications are all over the map. Let’s dig a little deeper into how these teams put picture annotation software to work.
Development and QA Teams
For software developers and quality assurance (QA) testers, picture annotation software is the ultimate bug-squashing tool. Gone are the days of writing a novel to describe a visual glitch. Now, a QA tester can just snap a screenshot, circle the exact problem, and tag the developer responsible.
This visual-first approach just clicks. Instead of reading "the user login button is misaligned on the mobile view," a developer sees a screenshot with an arrow pointing right at the crooked button. That kind of clarity speeds up the entire debugging process, cuts down on the back-and-forth, and gets products polished and shipped faster. This is why having a simple, no-fuss tool is so critical—you can learn more in our guide on why a simple screenshot annotation tool makes all the difference.
UX and Design Teams
User experience (UX) and design teams live and breathe visual feedback. Before these tools, getting input on wireframes and mockups was pure chaos—think confusing email threads or long, rambling meetings where nothing got decided.
Picture annotation software transforms design reviews from a series of disjointed opinions into a structured, contextual conversation.
Now, a UX designer can share a link to a new interface, and stakeholders can drop comments directly onto specific elements. A product manager might place a pin on a confusing icon and ask, "What does this do?" while a copywriter suggests better text for a headline, right where it belongs. This keeps all the feedback organized and directly tied to the visuals, making revisions quicker and way more accurate.
Marketing and Creative Teams
For marketing and creative pros, getting the visuals right is everything. Whether it’s a new social media graphic, a website banner, or a print ad, the details matter. Picture annotation tools become the central hub for the whole creative review and approval dance.
Instead of trying to describe changes over a choppy video call, the team can collaborate right on the creative asset itself. It just works.
Social Media Managers can highlight part of an image that isn't working and suggest a better crop.
Brand Managers can flag inconsistencies on a mockup to make sure logos and color palettes are spot-on.
Content Strategists can point to the exact part of an image they want to feature in a blog post for maximum impact.
This hands-on process ensures the final product is polished, on-brand, and actually effective. For example, fashion and retail teams are using annotated data to build cool new features like AI clothing try-on technology, which all starts with refining visual data internally. By making feedback precise and easy, these tools help teams create marketing campaigns that truly connect with people.
How to Choose the Right Picture Annotation Software
With so many picture annotation tools out there, picking the right one can feel like a chore. The thing is, the right tool will make your projects fly, while the wrong one just creates headaches and bottlenecks for your team. It's a big decision.
To get it right, it helps to break down what actually matters. Think of it less like buying software and more like hiring a new team member. You've got to make sure they play well with others (integrations), can handle a growing workload (scalability), and can be trusted with company secrets (security). If you focus on these fundamentals, you can cut through the marketing fluff and find a tool that actually fits how your team works. For a broader look at how different tools stack up, resources like the ultimate AI tools tier list can offer some really valuable perspective.
Evaluate Core Collaboration Features
Modern work is a team sport, and your annotation software needs to be a star player, not a benchwarmer. The best tools are built for collaboration from the ground up, turning them from simple drawing apps into genuine communication hubs.
When you're kicking the tires on a potential new tool, ask some hard questions. Can multiple people jump in and comment on the same image at the same time? What about permissions? You absolutely need control over who can view, comment, or edit. It's crucial for keeping projects organized. Also, look for the little things that make a big difference, like @mentions to tag teammates and threaded comments to keep conversations organized and right where they belong.
The goal is to find a tool that centralizes visual communication. It should reduce the need for follow-up meetings by making every piece of feedback clear, actionable, and tied directly to the visual context.
Another thing that’s a total project-saver is version control. Can you easily see a history of who changed what and when? This isn't just a "nice-to-have." Trust me, when you need to roll back to a previous version or figure out why a change was made, a clear history log is a lifesaver.
Prioritize Seamless Integrations
Here's the deal: an annotation tool doesn't live on an island. It has to connect with the other software your team uses every single day. Strong integrations are what separate a decent utility from an indispensable part of your workflow. Without them, you’re just signing your team up for a lot of tedious copy-pasting.
The big ones are your project management tools. You need to look for native connections to platforms like:
Jira: Can you turn an annotation into a Jira ticket with one click? This is a complete game-changer for dev and QA teams. A visual bug report becomes an actionable task in seconds.
Slack: Will the tool ping a Slack channel when new feedback is added? This keeps everyone in the loop without them having to constantly check another platform.
Notion or Asana: How easy is it to link visual feedback directly to your project boards or internal docs?
These connections grease the wheels and cut out the manual work, making sure visual feedback flows right into the systems you already have. We've actually put together a detailed comparison of the best website annotation tools in 2024 that dives deep into how different platforms handle their integrations.
Ensure Scalability and Security
Finally, you have to think about the future. The tool that works great for your tiny team of three might completely fall apart when you grow to thirty, or when you're dealing with a project that has thousands of images. Scalability is all about making sure the software can grow with you.
Security is just as important—it's non-negotiable, really. This is especially true if you’re working with confidential designs or sensitive client data. Dig into their security protocols. Ask them where your data is stored and if it's encrypted. Getting clear answers on security will give you the peace of mind that your most valuable assets are safe and sound.
Implementing a Successful Annotation Workflow
Having the right picture annotation software is a great start, but honestly, it’s the process you build around it that makes or breaks your project. A powerful tool without a smart workflow is like a sports car stuck in traffic—full of potential but going nowhere fast. What we're talking about is creating a predictable, repeatable system that ensures every single annotation is accurate, consistent, and actually moves your project forward.
This process doesn't need to be some overly complicated, bureaucratic nightmare. It just needs to be intentional. By setting clear rules, building in some checks and balances, and empowering your team, you can turn what could be a chaotic labeling free-for-all into a well-oiled machine that pumps out high-quality results every single time.
Create Crystal-Clear Annotation Guidelines
Before a single image gets touched, your very first step is to create a super-detailed set of annotation guidelines. Think of this document as your project's constitution. It should leave zero room for interpretation and spell out exactly how every object, feature, or piece of feedback should be handled.
This rulebook is the bedrock of consistency. Without it, one annotator might label a "partially obscured car" while another ignores it completely, leaving you with a messy, unreliable dataset. Good guidelines are the single source of truth that keeps everyone on the same page.
To make your guidelines truly effective, make sure you include:
Precise Definitions: Clearly define every single label and category. What exactly constitutes a "bug" versus a "feature request" when you're gathering feedback? Be specific.
Visual Examples: Show, don't just tell. This is huge. Include multiple visual examples for each rule, showcasing both the right way ("do this") and the wrong way ("don't do this") to annotate.
Edge Case Handling: You have to address the tricky situations. What happens when objects overlap? How should your team handle blurry or low-quality images? Thinking through these scenarios upfront will save you countless hours of confusion down the road.
A well-defined annotation workflow isn't just about managing tasks; it's about building a scalable system for quality. It ensures that whether you have two annotators or two hundred, the results remain consistent and reliable.
Establish a Multi-Layered Quality Assurance Process
Look, mistakes are going to happen. It's inevitable. But a strong quality assurance (QA) process ensures they get caught and corrected before they cause any real problems. A multi-layered approach acts as a safety net, with review cycles designed to catch errors at different stages. This is what keeps bad data from poisoning your results and prevents costly rework later on.
The most common method I've seen work well is a simple review-and-correction loop. An annotator labels an image, and then it gets passed to a senior reviewer. That reviewer checks the work against the guidelines, either approving it or kicking it back with specific feedback for correction. This process not only polishes your data quality but also doubles as a fantastic, continuous training tool for your team.
For bigger projects, you can even introduce a third layer, like random spot-checks or a consensus model where multiple people label the same image and the software flags any disagreements. The key is to build a feedback loop that reinforces quality at every step. For those focused on team collaboration, our guide on how to annotate pictures for clear feedback has some practical steps to get you started.
Train Your Team and Track Performance
At the end of the day, your workflow is only as strong as the people running it. Proper training is non-negotiable. You need to get your team comfortable with the software and, more importantly, with your project's specific guidelines. A great way to kick things off is with a calibration session—have the whole team annotate the same small batch of images and then discuss the results together.
This helps align everyone's understanding of the rules and clears up any gray areas in the guidelines. Once the project is rolling, tracking performance metrics helps you monitor progress without having to micromanage. Key metrics like annotation speed, accuracy rates, and agreement scores can help you spot where individuals might be struggling or where your guidelines need a little tweaking. This data-driven approach lets you provide targeted support and constantly improve your workflow's efficiency and output.
Look, even the best-laid plans can go sideways. When you’re dealing with picture annotation software, a few common slip-ups can totally derail your project. You end up with wasted time, messy data, and a team that’s pulling their hair out. But if you know what to look out for, you can sidestep these problems from the get-go.
One of the biggest issues I see time and time again is ambiguous guidelines. Seriously. When your rulebook is fuzzy, your team is left to guess, and that’s a recipe for disaster. You get wildly inconsistent labels, which completely tanks your AI datasets or sends your creative team down the wrong path. Next thing you know, you’re redoing weeks of work.
Then there's the sneaky problem of hidden annotator bias. Everyone sees things a little differently, right? Without getting everyone on the same page, those tiny biases creep in and create errors that can throw off an entire AI model or misguide a whole design revision.
Inconsistent Labeling and Vague Rules
The only way to fight ambiguity is with crystal-clear instructions. Your goal should be to create guidelines so solid that two different people, looking at the same tricky image, would label it in the exact same way. This means going way beyond basic definitions and planning for all the weird stuff you’ll encounter.
Here’s what your team should be doing:
Run calibration sessions: Before you kick off a big project, get everyone to annotate the same small batch of images. Talk through the results. This is the best way to align on how to handle those confusing or unusual cases.
Build a visual "source of truth": Your guidelines need to be loaded with pictures. Show examples of what to do and, just as importantly, what not to do. Don’t just tell them; show them.
Keep it a living document: New edge cases will pop up. I guarantee it. When they do, add them to your guidelines immediately. This document should grow and change right along with your project.
Getting ahead of ambiguity isn't just about preventing mistakes. It gives your team the confidence to work faster and more efficiently. Your guidelines become a tool for success, not a source of frustration.
Poor Data Versioning and Tool Selection
Here’s a pitfall that’s less obvious but can be just as painful: poor data versioning. Your annotated datasets are just like source code—they change. Without a system to track those changes, you can easily lose work or, even worse, train a model on an old, incorrect set of labels. Any modern annotation tool worth its salt should have version control built right in.
Finally, don’t make the mistake of committing to the wrong tool too quickly. Getting locked into a platform that doesn’t actually fit your workflow is a costly headache you don’t need.
The fix is simple: run a small pilot project. Before you go all-in, test a new tool on a tiny, low-stakes project. This lets you kick the tires on its features, see how it handles collaboration, and get a real feel for it without putting your main project at risk. A little time spent upfront can save you from a world of hurt later on.
Got Questions? We've Got Answers
Jumping into the world of picture annotation software can definitely bring up a few questions. I've been there. Let's clear up some of the most common ones I hear from teams just like yours.
AI Training vs. Team Feedback
So, what's the real difference between annotating for an AI and just giving feedback to your team? While they both involve drawing on an image, the reason you're doing it is completely different. And that changes everything.
When you're annotating for an AI project, the annotation is the final product. Every single label, box, or polygon is a piece of data you're feeding into a machine learning model. The whole point is to create a massive, squeaky-clean dataset so the AI can learn.
But for team feedback? The annotation is just a communication shortcut. It’s the means to an end, not the end itself. The markup on a screenshot is there to point out a bug, question a design choice, or ask something with crystal clarity. It’s a conversation starter.
It all boils down to your audience. AI annotations are for a machine to learn. Team feedback annotations are for a human to understand and take action. One creates data; the other creates a conversation.
What Do These Tools Usually Cost?
This is a big one. What's the damage to the wallet? Pricing for picture annotation tools is all over the map, and it really hinges on what the tool does and what your team needs.
You'll typically see a few models out there:
Monthly Per-User Subscriptions: This is the classic SaaS model. You pay a set fee each month for every person on your team. Simple and predictable.
Usage-Based Fees: This is more common with the heavy-duty AI labeling platforms. They might charge you based on how many images you process or how many annotations you make.
Free and Open-Source: Tools like CVAT are completely free, which is awesome. The catch? You'll likely need some technical chops to get it set up and keep it running on your own servers.
The final price tag is usually influenced by things like the number of features, the size of your team, whether it's on the cloud or self-hosted, and if you need fancy extras like AI-assisted labeling.
Do They Play Nice with Tools like Jira or Slack?
Absolutely. In fact, if a modern picture annotation software doesn't integrate with other tools, that's a huge red flag. Most of these platforms are built knowing they need to slide right into your existing workflow, not blow it up.
You should be looking for direct connections to the big names in project management and communication—think Jira, Slack, Trello, and Asana. These integrations are what make the whole process so efficient. They create a seamless path from visual feedback to an actual task, which means no more manually copying and pasting info between apps and hoping nothing gets lost along the way.
Ready to stop wasting time in confusing meetings and long email threads? Beep turns visual feedback into clear, actionable tasks directly on your live website, cutting down project time by hours. Get started for free in under a minute.
Comments