
.png)
Screenshot Web Page Chrome: screenshot web page chrome Guide
- Henry Barks
- Feb 5
- 12 min read

When you need to grab a screenshot in Chrome, the absolute fastest way is to use the keyboard shortcuts built right into your computer. No extensions, no extra software—just a quick key press.
For Windows users, it's usually the good old Print Screen key or the Snipping Tool. If you're on a Mac, you're likely familiar with combos like Cmd+Shift+3 for a full-screen grab. These native tools are your best friend for quick, on-the-fly captures.
Quick and Simple Ways to Capture Your Screen
Sometimes you just need to capture what you see on your screen right now. In those moments, your operating system's built-in tools are perfect. They're already there, waiting to be used, so there’s nothing to install and no workflow interruption.
I find myself using these all the time. Imagine you're a product manager and you spot a weird UI glitch during a demo. A quick key combo freezes that moment in time, giving you a perfect visual to share with the dev team. Or maybe you're a designer who sees a navigation bar you love—a selective capture lets you grab just that element for your mood board.
Choosing the Right Shortcut for the Job
The real trick is knowing which shortcut to use. Your main choices are grabbing the entire screen, just the active window, or a specific little piece of it.
Full-Screen Capture: This grabs everything on your monitor(s). It's great when you need to show the full context, like how the Chrome window looks alongside another open application.
Active Window Capture: This is my go-to. It isolates and captures only the Chrome browser window, cutting out the clutter of my desktop and other apps. It keeps the focus squarely on the webpage.
Selected Area Capture: This is for when you need precision. You can draw a box around the exact chart, image, or chunk of text you want. It’s perfect for isolating one specific thing without any distractions.
This little decision tree can help you figure out which method to use on the fly.
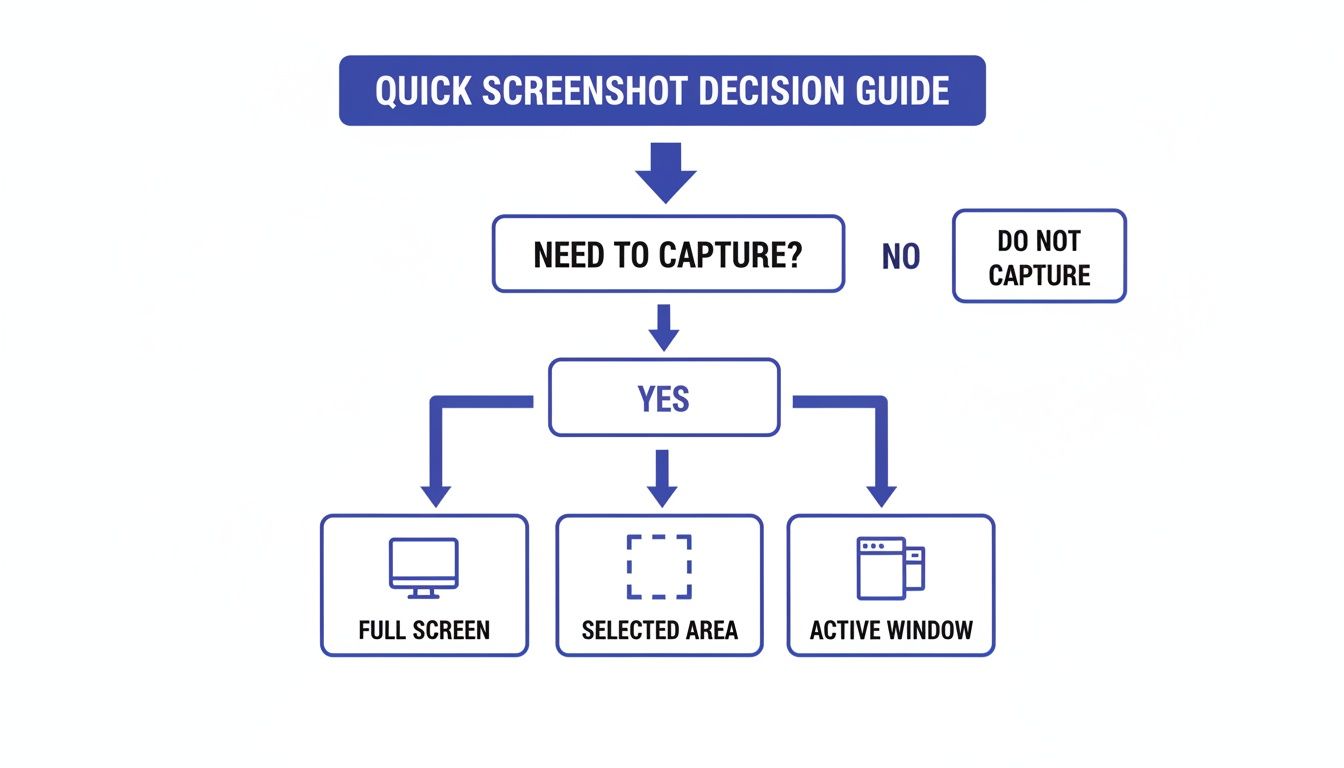
As you can see, what you need to capture—everything, just the browser, or a tiny part—maps directly to a specific kind of screenshot.
Native Screenshot Shortcuts At a Glance
To make it even easier, here's a quick reference table comparing the most common screenshot commands for both Windows and macOS.
Operating System | Keystroke | Capture Type | Best For |
|---|---|---|---|
Windows | Full Screen | Capturing everything on all your monitors. | |
Windows | + | Active Window | Grabbing just the current Chrome window without desktop clutter. |
Windows | + + | Selected Area | Precisely selecting a specific element or region. |
macOS | + + | Full Screen | Instantly capturing your entire screen to the desktop. |
macOS | + + | Selected Area | Drawing a box around the exact part of the page you need. |
macOS | + + + | Active Window | Capturing a specific window or menu with a clean drop shadow. |
Memorizing just one or two of these can seriously speed up your daily workflow.
Why Mastering Chrome Screenshots Matters
Let's be real, almost everyone works in Chrome. Google's browser has a massive 67.72% worldwide market share, making it the default environment for most web professionals.
For product managers, UX/UI designers, and developers, this means the vast majority of feedback cycles and reviews happen right inside a Chrome window. If you want to learn more, you can read up on Chrome's user base and its impact on development.
Knowing how to screenshot a web page in Chrome isn't just a minor convenience—it's a core skill for clear communication and solid documentation in any modern team.
Unlocking Advanced Captures with Chrome DevTools
Keyboard shortcuts are fantastic for a quick grab, but they hit a wall when you're dealing with long, scrolling pages or need to isolate a specific button. For that kind of precision, we need to pop the hood and use a tool you already have: Chrome Developer Tools.
Don't let the name scare you. DevTools isn't just for coders; it's a powerhouse for anyone who needs professional-grade screenshots without adding another extension. Think of it as the secret control panel for any webpage you visit.
Getting in is easy. Just right-click anywhere on a page and hit Inspect, or use the shortcut (on Windows) or (on Mac). Once you're in, you've unlocked a whole new set of screenshot commands that give you pixel-perfect control.
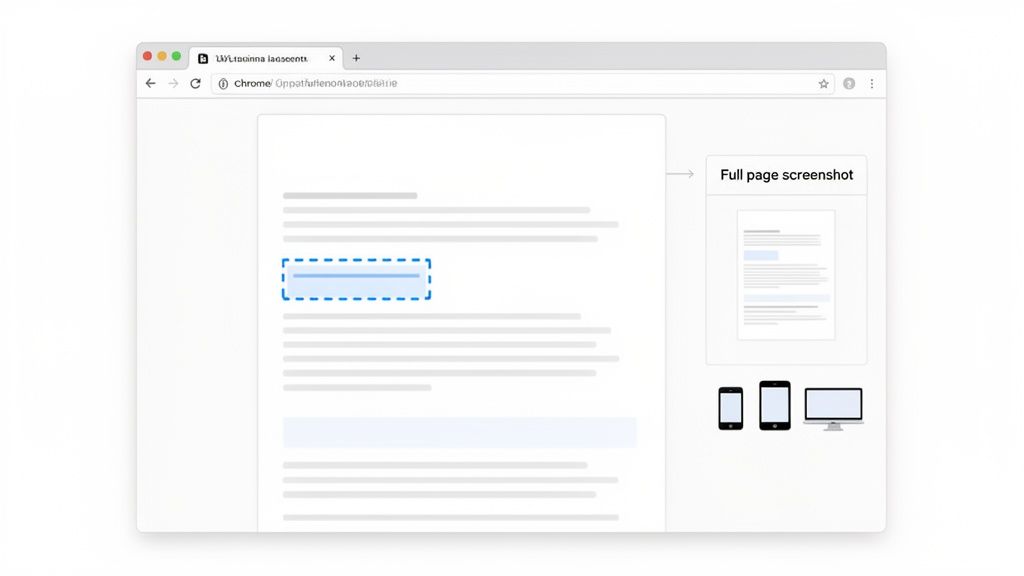
Capturing Full-Length Web Pages
We've all been there—trying to screenshot a web page in Chrome that scrolls on forever. Taping multiple screenshots together is a nightmare and always looks sloppy. DevTools has a much cleaner solution.
Inside the DevTools panel, open the Command Menu by pressing (Windows) or (Mac). This brings up a handy search bar. From here, you’ve got a couple of great options:
Capture full size screenshot: My personal favorite. Just type "full" and select this option. Chrome will automatically scroll down the entire page and stitch it into one seamless, high-resolution PNG. It's a lifesaver for reviewing long landing pages or documenting a complete user journey.
Capture screenshot: This one acts like a standard screenshot, grabbing only what you can currently see in your browser window (the viewport).
Honestly, the full-page capture alone is a total game-changer.
Isolating a Single Page Element
What if you just need a perfect shot of one button, a single product card, or the site header? Manually cropping it is a pain and rarely comes out clean.
With DevTools, you can snag it perfectly every time.
Just right-click the exact element you want to capture and choose Inspect. This pops open the DevTools panel and highlights the element's code. Now, right-click on that highlighted line of HTML, hover over Capture node screenshot, and click. Boom. Chrome saves a tightly cropped image of just that element, no background clutter included.
This method is my go-to for creating crystal-clear documentation or flagging a specific UI component for a design review. It ensures your captures are perfectly framed, every single time.
Emulating Mobile and Tablet Views
Another gem hidden inside DevTools is the Device Toolbar. You can find it by clicking the little phone-and-tablet icon in the top-left of the DevTools panel. This tool is incredible—it lets you see and interact with a website exactly as it would look on an iPhone 14 Pro, a Google Pixel, or dozens of other devices.
Once you have a device emulated, just use the same Command Menu () to take a screenshot web page chrome capture. This gives you a flawless image of your site's mobile view, which is absolutely essential for responsive design testing and sharing mobile-specific feedback with your team.
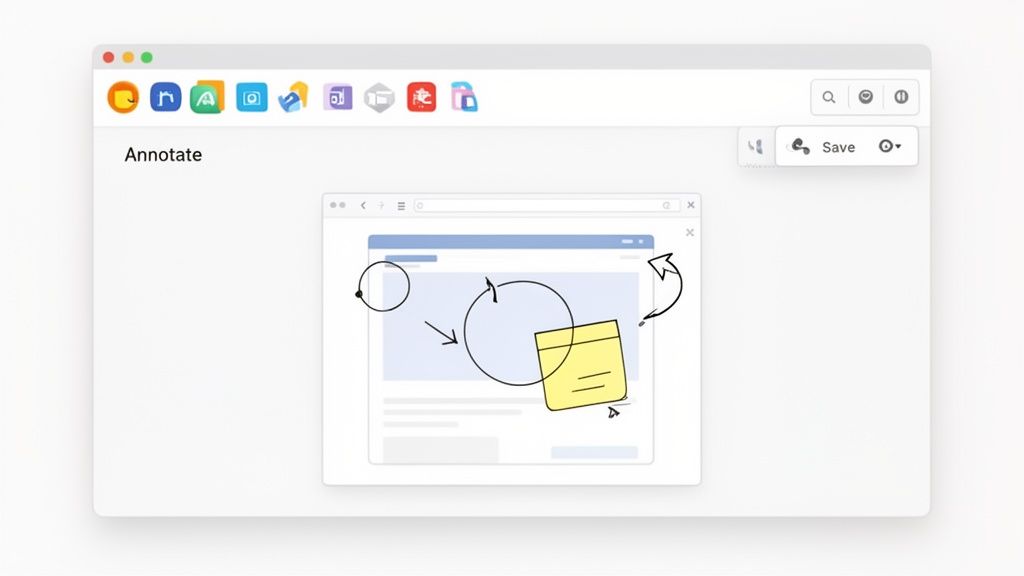
Supercharge Your Workflow with Screenshot Extensions
While Chrome's built-in tools are pretty handy, they definitely have their limits. When you find yourself needing more—like detailed annotations, one-click cloud saving, or even quick screen recordings—it’s time to dive into the world of Chrome extensions. These little add-ons can completely change how you capture webpages, turning a simple screenshot into a powerful feedback tool.
Think of extensions as mini-apps that live right in your browser, adding features that Chrome doesn't offer out of the box. For screenshotting, they're brilliant at handling tricky, dynamic pages with elements like sticky headers or lazy-loading images, which often cause problems for the standard DevTools capture.
I’ve seen marketing teams use extensions to quickly mark up a new landing page with arrows pointing out copy changes and circles highlighting design tweaks. Instead of a long, confusing email chain, they share a single, crystal-clear visual. It’s a total game-changer for feedback.
Finding The Right Extension For Your Needs
Jumping into the Chrome Web Store can feel a bit overwhelming, with over 110,000 extensions available. But when it comes to screenshot tools, a few clear winners stand out for their reliability and killer features.
The key is to pick one that matches what you need to do after you hit "capture."
For Perfect Full-Page Captures: If your main goal is getting a pixel-perfect snapshot of a super long page, a dedicated tool like GoFullPage is your best bet. These extensions are built specifically to handle the complexities that Chrome's native tools often miss.
For Detailed Feedback and Annotation: Constantly adding notes, arrows, or blurring out sensitive info? You’ll want an extension with a solid set of editing tools baked right in.
For Creating Quick Guides: A support agent, for instance, might need to show a customer how to navigate a settings menu. An extension that can record a short video or GIF is absolutely invaluable here.
The real power of a good screenshot extension isn’t just taking the picture; it's what you can immediately do with it. The best ones cut down the steps between capturing and sharing, saving you a ton of time.
Top Chrome Screenshot Extensions Compared
To help you choose, here's a quick rundown of how some of the most popular extensions stack up. A lot of these tools do more than just take pictures and can seriously boost your daily output. For more ideas, you might also want to check out our guide on the best Chrome extensions for productivity in 2024.
Extension Name | Full Page Capture | Annotation Tools | Video Recording | Best For |
|---|---|---|---|---|
GoFullPage | Excellent | None | No | Simple, reliable full-page captures without extra features. |
Awesome Screenshot | Good | Excellent | Yes | All-in-one users who need annotations and screen recording. |
Nimbus | Good | Excellent | Yes | Teams needing advanced editing, branding, and integrations. |
Lightshot | No | Good | No | Quick, selective area captures with simple, fast annotations. |
Ultimately, the best extension is the one that fits so smoothly into your workflow that you forget it’s even there. It just works, helping you communicate more clearly and get things done faster.
Automating Screenshots for Developers and QA
If you're on a development or QA team, you know the grind of taking screenshots manually. It's a massive time sink—repetitive, slow, and worst of all, easy to mess up. This is especially true when you're trying to test a site across a dozen different screen sizes and browsers.
This is where automation steps in and completely changes the game. Forget clicking and saving all day. By using a few clever tools, you can script Chrome to capture webpages on its own, saving you a ton of headaches. The real magic happens with something called Headless Chrome, which is just a version of the browser that runs in the background without a visual interface. It’s perfect for automated tasks running on a server.
The Power of Headless Browser Automation
So, what can you actually do with this? Headless automation lets you write scripts that tell a browser what to do: go to a URL, click a button, fill out a form, and—you guessed it—take a screenshot at the perfect moment. It opens up a whole new world for scaling up your testing.
Picture this: every time new code is deployed, a script automatically kicks off. It could be programmed to:
Visit all the critical pages—homepage, product pages, the checkout flow.
Snap full-page screenshots at different resolutions to simulate desktop, tablet, and mobile views.
Compare these fresh screenshots against a set of "golden master" images to spot any unexpected visual bugs.
This whole process is called visual regression testing, and it’s a lifesaver for catching those pesky UI bugs, like a button that’s suddenly off-center or a font that’s rendering incorrectly, before they ever make it to your users. It flips a tedious manual task into an automated safety net that runs 24/7.
By automating visual checks, teams can stop wasting time on repetitive clicking and focus on what really matters: tackling complex bugs and improving the user experience. It's not just about speed; it's about shipping higher-quality work, consistently.
Getting Started with Automation Tools
Diving into browser automation is easier than you might think. A couple of fantastic libraries do most of the heavy lifting for you: Puppeteer (made by Google) and Playwright (from Microsoft). Both give you a straightforward way to script browser actions.
For instance, here’s a super simple script using Puppeteer to grab a screenshot. Don't let the code intimidate you; it's pretty readable.
const puppeteer = require('puppeteer');
(async () => { const browser = await puppeteer.launch(); const page = await browser.newPage(); await page.goto('https://example.com'); await page.screenshot({ path: 'example.png' }); await browser.close(); })();
This little chunk of code just launches a browser, goes to a website, saves an image, and closes. You can build on this simple foundation to create some seriously powerful testing workflows. If you want a full rundown of how this fits into the bigger picture, the ultimate web QA checklist is a great place to start.
And for those who want to go even deeper, maybe for more advanced testing or data scraping, this guide on browser automation with Python offers great insights into using tools like Selenium and Playwright in a different programming environment.
Turning Captures Into Collaborative Action
Grabbing a screenshot of a webpage is just the first domino. The real magic happens when that image helps your team talk clearly and squash problems faster.
Let’s be honest, we’ve all been there. A static image gets tossed into a Slack channel or email thread, completely stripped of its context. What follows is a confusing back-and-forth that wastes everyone's time. Thankfully, that clunky process is on its way out.
The new way of working is all about bringing the feedback directly to the source. Instead of just emailing a picture, modern tools let your team drop comments right onto a live webpage. Every time someone leaves a note, the platform automatically snaps a tagged screenshot and bundles it with all the technical data a developer could dream of.
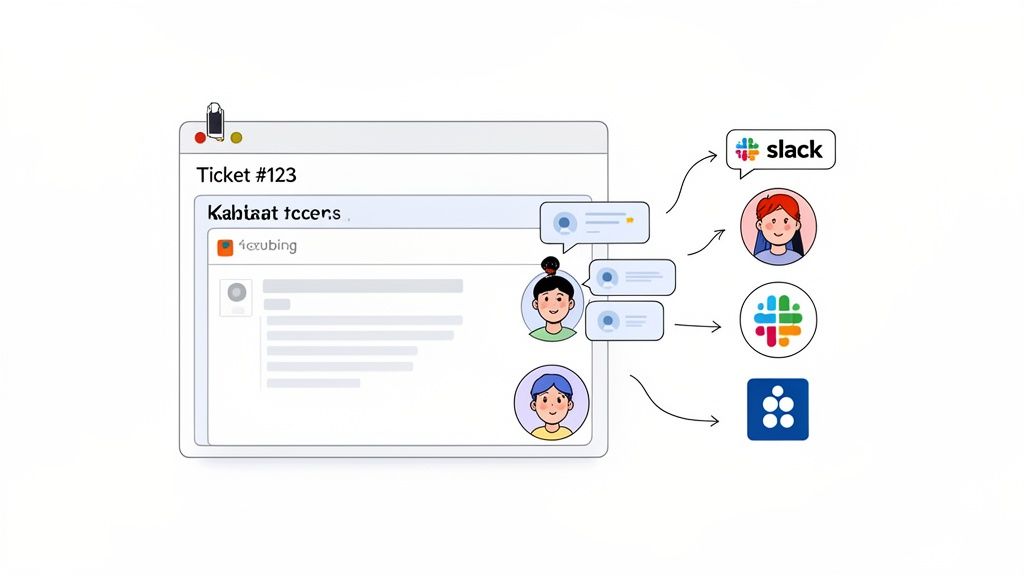
This creates an airtight feedback loop where every comment is visually anchored to a specific element on the page. No more guessing which "blue button" someone is talking about.
A Real-World Collaboration Scenario
Picture a product manager, a designer, and a developer gearing up for a new feature launch. The old way meant a long meeting, a recap email that no one reads, and then a chaotic storm of Slack messages with random screenshots attached. It’s slow, messy, and a recipe for mistakes.
Here's how that same workflow looks with a proper feedback tool:
The Product Manager hops on the live staging link. They click and drop comments directly on the page for anything that needs a tweak, like, "Let's change this headline copy." Boom—a task is created, complete with a screenshot.
The Designer jumps in next, adding their own visual feedback right on the same page. They might point out a sneaky alignment issue or a color that's a few shades off, with their notes appearing right alongside the PM's.
The Developer gets a clean notification in Slack or Jira. They see an organized list of tasks, each one tied to a visual reference and packed with all the context they need to get straight to work.
This integrated approach transforms a chaotic feedback process into a streamlined, actionable workflow. It keeps a perfect visual record of every decision, making everyone more accountable and aligned.
This isn't just about getting organized; it fundamentally speeds up your projects. I've seen teams slash the time they spend in meetings trying to explain visual bugs. A single, well-placed comment with its attached screenshot can easily replace a 10-minute conversation. Issues get found and fixed in hours, not days.
Connecting Feedback to Your Project Tools
The real knockout punch is how this system syncs up with the tools your team already relies on. A visual comment left on a webpage can instantly morph into a task in your project management software.
Think about how this plugs into your favorite platforms:
Kanban Boards: A comment on the site can auto-populate a board like Trello, creating a new card in the "To Do" column.
Jira & Asana: Feedback can be pushed directly into your existing sprints, creating detailed tickets complete with visuals and browser metadata.
Slack & Teams: Instant notifications ping the right people, so they can jump on a quick clarification without ever leaving their chat app.
By baking screenshot-driven feedback right into your project management, you create a single source of truth. Every task is directly tied to a visual, killing ambiguity and making sure everyone is on the same page. If you're ready to explore this, you can learn more about the top website annotation tools that make it all possible.
Got Questions? I've Got Answers
Even with the best tricks up your sleeve, you're bound to hit a snag or two when capturing webpages. It happens to everyone. Here are some of the most common questions I hear, along with quick answers to get you back on track.
How Can I Screenshot an Entire Web Page in Chrome Without an Extension?
You don't need one! Chrome has a powerful set of Developer Tools built right in.
Just pop open the DevTools panel with Ctrl+Shift+I (or Cmd+Option+I on Mac). Then, bring up the Command Menu using Ctrl+Shift+P (or Cmd+Shift+P).
Start typing "screenshot" in the search bar, and you'll see an option for 'Capture full size screenshot'. Click that, and Chrome will save the whole scrolling page as a single PNG file. Easy peasy.
Why Do My Full-Page Screenshots Sometimes Look Blurry or Cut Off?
Ah, the classic screenshot gremlins. This usually happens for two reasons on modern websites.
First, many sites use "lazy loading," which means images and content only load as you scroll down. If you capture too quickly, the tool grabs a bunch of empty space. The other culprit is sticky headers or footers—those bars that stay fixed at the top or bottom of the screen. They can mess with the stitching process and create weird overlaps.
Here’s a simple fix: manually scroll all the way to the bottom of the page before you take the screenshot. This forces everything to load. If that doesn't work, a dedicated screenshot extension often has smarter algorithms to handle these tricky layouts.
A quick pre-scroll is a simple trick that solves about 90% of capture issues with lazy-loaded content. It forces the browser to render everything on the page, giving the screenshot tool a complete canvas to work with.
Is It Possible to Capture Just One Specific Element on a Page?
Absolutely, and DevTools makes this incredibly precise.
Find the element you want—maybe it's a specific button, a user avatar, or a chart. Right-click on it and select 'Inspect' from the menu.
This will jump you right to that element's code in the Elements panel. Just right-click the highlighted code, find 'Capture node screenshot,' and Chrome will save a perfectly cropped image of just that element. No more messy manual cropping.
What's the Best Way to Share and Annotate Screenshots with My Team?
Emailing static images back and forth gets chaotic fast. For real collaboration, you want a tool that keeps the feedback right where it belongs: on the website itself.
Platforms like Beep are a game-changer here. You can drop comments directly on a live webpage, and each note automatically creates a screenshot with all the context attached. It keeps all the feedback organized and in one place.
Plus, these tools often plug right into your project management software like Jira or Notion, turning visual feedback into actionable tickets without any extra steps. It just streamlines the entire review process.
Ready to transform your feedback process from chaotic to collaborative? Beep lets you drop comments directly on live websites, turning every note into a perfectly captured, actionable task. Get started for free in under a minute and see how much time you can save.
Comments