
.png)
A Practical Guide to Integrate With Jira and Automate Your Workflow
- shems sheikh
- Feb 1
- 13 min read

If you've ever felt the chaos of juggling feedback from Slack messages, endless email chains, and scattered spreadsheets, you know the struggle. There's a frustrating gap between what users are flagging on your website and what your developers are actually working on. The solution? Integrating your feedback process directly with Jira, creating a single, unified workflow where visual feedback instantly becomes an actionable task.
Why You Should Integrate With Jira to Unify Your Workflow

Without that direct connection, the path from user feedback to a developer's to-do list is a minefield of manual, error-prone steps. I've seen product managers spend hours just copying comments, attaching screenshots, and creating tickets by hand. Inevitably, critical context like the browser version or screen resolution gets lost along the way.
This disjointed process isn't just a time-waster; it creates friction that grinds the entire development cycle to a halt. It turns valuable user feedback into a disruptive chore instead of a seamless part of building a better product.
The Problem With Scattered Feedback
When your feedback is all over the place, a few key problems pop up that directly hurt your team's efficiency and the quality of your product. Every separate channel is another chance for something to get lost in translation.
Loss of Context: Details shared in a quick Slack thread might never make it into the final Jira ticket, leaving developers playing a guessing game.
Manual Data Entry: Creating tickets by hand is not only tedious but practically guarantees human error, leading to inaccurate bug reports.
Delayed Action: Feedback can sit in someone's inbox for days before it's properly triaged and assigned. That means critical fixes and improvements get pushed back.
To really get why this integration is a game-changer, it helps to understand the whole Software Development Life Cycle Explained.
By connecting a tool like Beep directly to Jira, you eliminate these bottlenecks. Feedback captured on a live site is sent to the development backlog in seconds, complete with all the technical details needed to start work immediately.
Embracing a Centralized Workflow
Hooking your feedback tool into Jira is more than just a convenience—it's a strategic move. Let's face it, Jira is the dominant force in project management software, controlling roughly 42% of the market share globally. The platform now serves over 300,000 customer organizations, making it the undisputed hub for countless development teams.
This widespread adoption means a direct integration works with your team's existing habits, not against them. You aren't forcing anyone to learn a new process. When feedback becomes a natural extension of your project board, you maintain a single source of truth.
This approach helps teams move faster and build with more confidence, which is what agile is all about. If you're looking to level up your team's workflow, you might find our guide on what the Kanban methodology is and how it helps interesting: https://www.justbeepit.com/post/what-is-kanban-methodology-a-guide-to-better-workflow.
Getting Your Ducks in a Row for the Beep and Jira Integration
Before you even think about connecting these two powerful tools, let’s talk prep. Trust me, spending a little time upfront to get things in order will save you a world of headaches down the road. This is your pre-flight check to make sure the integration actually helps your team from day one, instead of just creating more noise.
First up is a quick permissions audit. You'll need admin-level access in both your Beep workspace and the specific Jira project you want to link. If you don't have the right permissions, the whole process will fall over before it even starts. Simple as that.
This is also the perfect time to get reacquainted with your Jira project's details. You’ll need to know its unique project key (ours is "BEEP," for example) and the specific issue types your team relies on, like 'Bug', 'Task', or 'Story'. These bits of info are non-negotiable for the setup process.
The screenshot above gives you a sneak peek of the integration settings in Beep. It’s clean and straightforward, which is exactly why having your Jira details ready to go makes the process so much smoother.
Get Your Team Aligned on a Workflow
Now for the most important part, and it has nothing to do with technology—it's about your team. You absolutely need to decide how you want this integration to work in the real world. Answering a few questions now will stop your Jira board from turning into a chaotic mess of disorganized tickets.
Get the key players together and hash out these points:
What's the Default Issue Type? Should every single annotation from Beep land in Jira as a 'Bug'? Or does it make more sense for them to come in as a 'Task'?
Who's the Default Assignee? Do you want all incoming feedback to funnel to one product manager for triage? Or should they just land in the backlog as unassigned?
What are the Must-Have Fields? Does your Jira workflow have mandatory fields that need to be filled out? Figure out if the integration can handle them or if you need a manual step in your process.
A five-minute chat with your team now will save you hours of cleaning up a messy backlog later. A clear plan is what separates a truly useful automation from a frustrating one.
Nailing down these rules means every piece of feedback lands exactly where it should, with the right context, ready for your team to jump on it. This initial groundwork is what makes the difference when you integrate with Jira, turning it into a workflow that actually clicks.
Connecting Beep to Your Jira Workspace
Okay, with all the prep work out of the way, it’s time for the fun part: making the connection. Linking Beep to your Jira workspace is a surprisingly quick process. We designed it to get you up and running without hitting any technical roadblocks.
Let’s walk through the authorization and connection steps. What might seem complex is really just a few simple clicks, all starting right from your Beep dashboard.
Authorizing Beep to Access Jira
First things first, you need to give Beep permission to act on your behalf in Jira. This is handled through a super secure process called OAuth, which is just a fancy way of saying you’ll never have to share your Jira password directly with us. Think of it like giving a valet a key that only starts the car—it doesn’t open the trunk or glove compartment.
When you kick off the connection from Beep, you’ll be bounced over to Atlassian’s official authorization screen. Jira will ask you to confirm that you’re cool with letting Beep:
View your user profile info: This just helps Beep attribute actions correctly and show your name.
Read Jira project data: Beep needs this to pull in a list of your Jira projects so you can pick the right one.
Create and modify issues: This is the big one. It’s the core permission that lets Beep turn your annotations into new tickets.
Granting these permissions is what powers the automation that’s about to save your team a ton of time. Once you approve, you’ll be sent right back to Beep to finish things up.
Selecting Your Jira Site
After you’ve given the green light, Beep will show you a list of the Jira sites tied to your Atlassian account. It’s pretty common for bigger companies to have multiple Jira instances—maybe one for the dev team and another for marketing.
It’s really important to select the correct Jira site where your project lives. This is a common hiccup, but it’s an easy fix. If you pick the wrong one by accident, your projects simply won't show up in the next step. No big deal, just go back and select the right site.
Pro Tip: If you're part of a large organization, the site URL is your best friend for telling instances apart. For example, is totally different from . A quick double-check here saves a headache later.
Once you’ve picked the right site and hit confirm, the connection is live! You’ll see a little confirmation message in your Beep dashboard letting you know the two platforms are officially talking to each other. This creates a secure API link between the tools, which is the foundation for everything that comes next. If you want to get nerdy about how different systems communicate, check out these top API integration examples to boost your apps.
From here, you’re ready to dial in the specifics—configuring exactly how your Beep feedback will magically transform into perfectly formatted Jira issues that your team can jump on right away. This next phase is where you really get to tailor the workflow to fit your team's process.
Configuring Project and Issue Mapping That Works for Your Team
Getting Beep and Jira connected is the first step, but the real magic happens when you teach them how to talk to each other. This is where you fine-tune the integration so every piece of visual feedback lands in Jira with the perfect context, assigned to the right person, and formatted exactly how your team works. Think of it less as building a bridge and more as hiring a flawless translator between two platforms.
This whole process boils down to three simple parts: Authorize, Select, and Confirm.
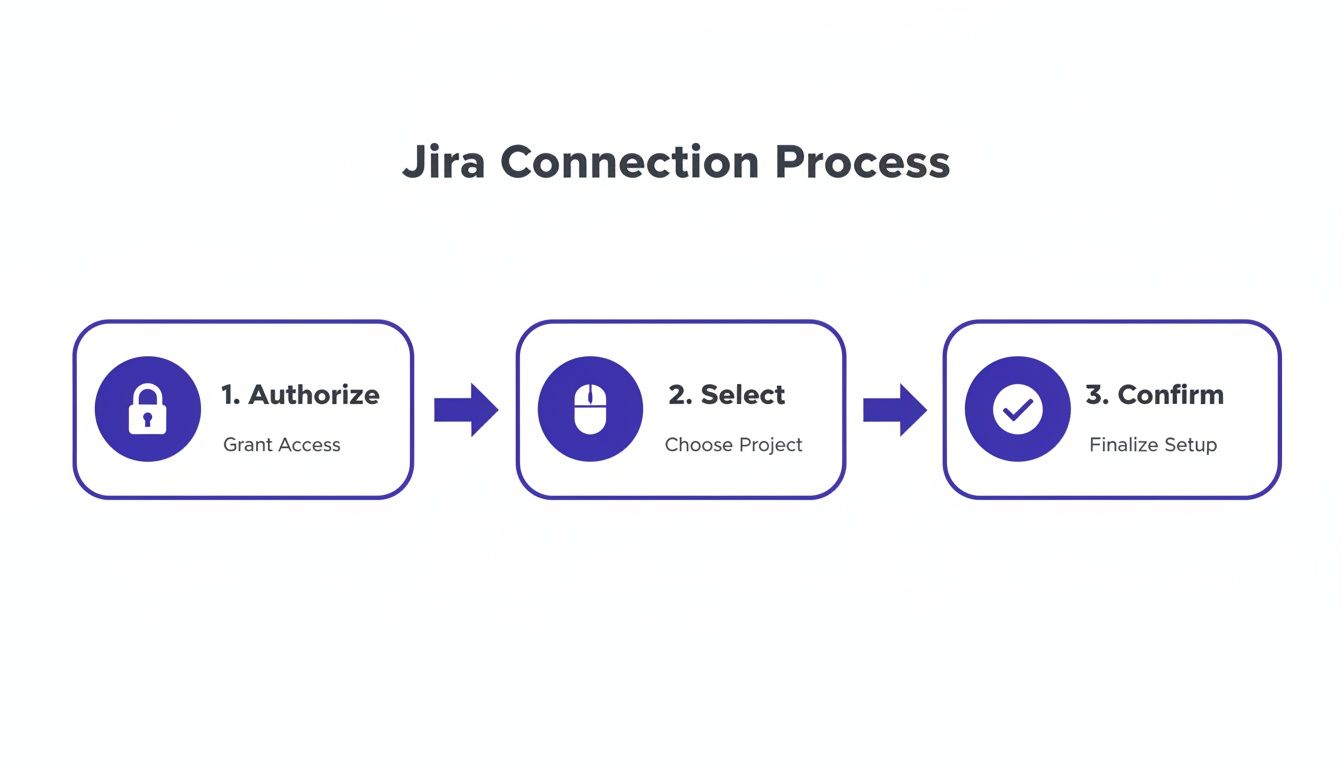
Once you've nailed this foundation, you can dive into the nitty-gritty of mapping.
Aligning Beep and Jira Projects
Your first move is to map your Beep projects to their corresponding Jira projects. It’s pretty straightforward—for example, you’d link your "Beep - Website Feedback" project directly to your "JIRA - Frontend Development" project. Simple.
Doing this ensures any annotation made in that Beep project automatically shows up in the correct development backlog. No more manual sorting or triage. It also prevents any cross-contamination. Feedback on your mobile app won't ever clutter the web team's backlog, keeping everyone’s workspace clean and organized.
This isn't just a technical step; it's a huge move toward better collaboration. A shocking 80% of product teams fail to bring engineers into the loop early on, which creates massive disconnects down the road. A well-configured integration solves this by routing feedback correctly from the get-go, pulling development into the conversation right when it starts. You can dig into the full findings from Atlassian's product report to learn more.
Customizing Issue Creation Rules
With your projects linked up, now you get to define exactly how a Beep annotation becomes a Jira issue. This is where you can bake your team's unique processes directly into the automation, which will save you countless hours.
Here are the key settings I always recommend dialing in:
Default Issue Type: Decide if feedback should default to a 'Bug', 'Task', 'Story', or a custom issue type you've created. For a QA workflow, 'Bug' is a no-brainer. For design reviews, 'Task' or 'Story' usually makes more sense.
Status Mapping: Align the statuses between Beep and Jira. For instance, an annotation marked 'To-do' in Beep can automatically land in the 'Backlog' status in Jira, ready for the next sprint planning session.
Custom Field Mapping: This is where you can get really specific. You can map Beep data to pretty much any Jira field. Automatically populate the 'Reporter' field with the person who left the comment, add Beep tags as Jira labels, or even map the browser version to a custom 'Environment' field. It's incredibly powerful.
Getting these rules right means every new Jira ticket arrives packed with context and needs zero manual cleanup from your team.
Example Jira Mapping Configurations for Different Teams
To give you a better idea, I’ve put together a table with some common setups. Use these as a starting point to configure how Beep annotations are sent to your Jira projects based on what your team does.
Team Type | Default Jira Issue Type | Custom Fields to Map | Recommended Workflow |
|---|---|---|---|
QA Team | Bug | Environment, Priority, Labels (e.g., "regression") | Route all feedback to a 'Triage' column for quick validation and assignment. |
UX/UI Design | Task | Component, Labels (e.g., "ui-polish") | Send feedback directly to the design team's backlog for review during design sprints. |
Product Management | Story | Epic Link, Priority | Triage new feature ideas and user requests, linking them to larger product epics. |
These are just examples, of course. The best part about this integration is its flexibility, so feel free to experiment and find the perfect configuration that makes your team's life easier.
Putting Your Automated Workflow into Action
So, you've connected Beep and Jira and laid down your automation rules. Now for the fun part: seeing it all work in the real world. This is where that initial setup time really starts to pay off, cutting out all the manual grunt work and seriously speeding up your team's feedback loop.
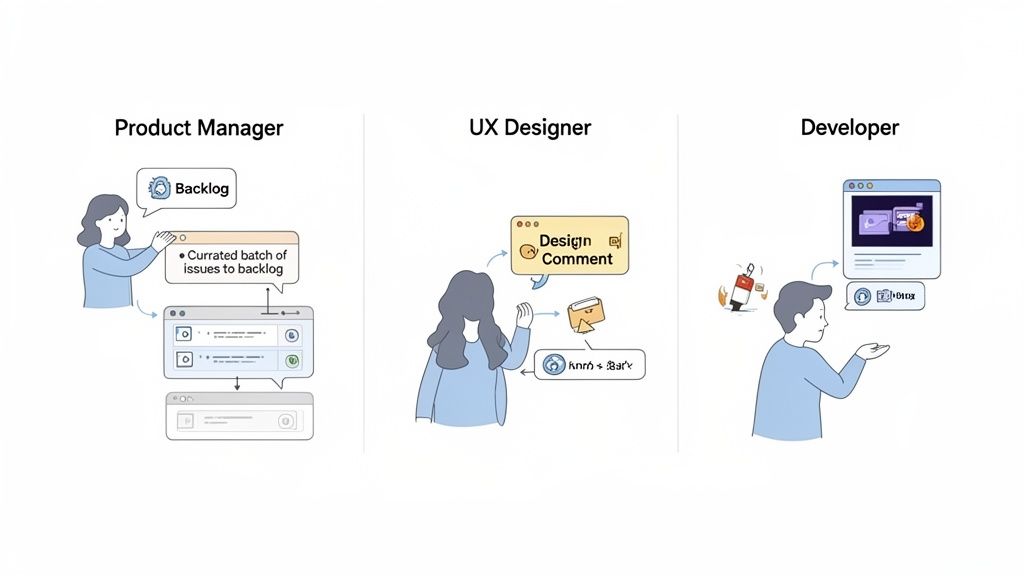
Let’s walk through a few common scenarios from the perspective of different team members to see how this actually feels day-to-day.
For Product Managers Streamlining Feedback Triage
Picture this: you've just finished up a user testing session. Instead of staring at a chaotic spreadsheet of notes, you've got a Beep project full of annotated comments right on your staging site. Your job is no longer about painstakingly copying and pasting every single insight into a new Jira ticket.
Now, you can just fly through the annotations inside Beep. See a valid point—a confusing button, a bug, a great feature idea? Just click "Send to Jira." The mapping rules you configured earlier kick in immediately, creating a fresh ticket in the backlog with the right issue type and priority already set.
I've seen PMs process an entire session's worth of feedback in minutes, not hours. It’s a total game-changer.
Pro Tip: Use Beep's tagging system to really put your automation on another level. For example, if you tag an annotation with "UI-Polish," you can set up a rule that automatically assigns the Jira ticket to your 'UI/UX' component and adds the 'design-review' label. This gets the right eyes on the issue instantly, no manual hand-off required.
For UX Designers Turning Comments into Tasks
A UX designer is clicking through a new feature on the staging server and spots three separate alignment issues and a color contrast problem. The old way? Take a bunch of screenshots, mark them up in another app, then manually create four separate Jira tickets for the front-end developer. Yawn.
With the integration, the designer just drops four quick comments directly on the page using Beep. Each annotation perfectly captures the visual proof. They can then send all four to Jira in one go. Instantly, the tickets pop up on the developer's board, each with the screenshot attached and a direct link back to the exact spot on the page. All that back-and-forth ambiguity is just… gone.
For Developers Receiving Perfect Bug Reports
For a developer, this workflow is a dream. It’s the end of vague, unhelpful bug reports. A new ticket lands in their sprint titled "Submit button is unresponsive on Safari," and the description is already packed with everything they need to get started:
Screenshot: The annotation on the broken button is right there.
User Info: The reporter's name and email.
Technical Context: Browser (Safari 17.1), OS (macOS Sonoma), and screen resolution (1920x1080).
Direct Link: A URL that takes them straight to the page where the bug was found.
This completely cuts out the frustrating back-and-forth just to get basic diagnostic info. The developer can replicate the issue on their first try and jump straight into debugging. It’s this kind of efficiency that shows why businesses integrate with Jira; it connects directly to measurable results.
In fact, Atlassian's revenue recently smashed $1.4 billion in a single quarter, and they noted that organizations using AI tools were expanding their Jira seats 5% faster than those that weren't. The time saved just adds up, creating a more focused and effective development cycle.
If you're interested in the wider world of optimizing business processes, exploring topics like CRM and automation development can uncover even more strategies. And if you're looking for other ways to improve your bug reporting, don't miss our guide on the 12 best bug tracking tools for dev teams.
Got Questions About the Beep and Jira Integration?
Even with a smooth setup, it's normal to have a few questions. When you're hooking up two powerful tools like Beep and Jira, a few common roadblocks can pop up. I’ve chatted with our support team to get you quick, clear answers to the things our users run into most often.
Think of this less like a generic FAQ and more like a field guide based on real-world challenges. It's here to help you troubleshoot fast and get the most out of your newly connected workflow.
What Should I Do If My Jira Project Isn't Showing Up in Beep?
This is probably the most common hiccup we see, and 99% of the time, it boils down to permissions.
First thing to check: make sure you have "Browse Projects" permission for that specific project inside your Jira account. You might need to have a quick chat with your Jira admin to get this sorted out. It's usually a simple fix on their end.
Next, it's worth double-checking whether your project is team-managed (what Jira used to call "next-gen") or company-managed ("classic"). This can sometimes affect how it shows up for third-party apps.
If you've confirmed your permissions are correct, the oldest trick in the book often works wonders: try refreshing the connection in Beep's integration settings. If that doesn't do it, re-authorizing the application completely almost always solves the problem. This simple action forces a reset of the API permissions and usually makes the project pop right up.
Can I Connect One Beep Project to Multiple Jira Projects?
Right now, the integration is designed for a one-to-one mapping. This means a single Beep project connects to a single Jira project. We did this on purpose—it guarantees that feedback always gets routed to the correct backlog without any confusion or risk of cluttering the wrong team's board.
If you need to send feedback to different teams or products, the best way to handle it is by setting up a Beep project for each. For example, your setup might look like this:
Beep Project: "Website Frontend" → Jira Project: "FRONT"
Beep Project: "Mobile App" → Jira Project: "MOBILE"
Trust me, this approach keeps your workflows clean and ensures every piece of feedback lands exactly where it needs to be.
Do Status Changes in Jira Sync Back to Beep?
The integration’s main job is to get detailed, contextual feedback out of Beep and into your Jira workflow where your team can act on it. When a Jira issue is created, it includes a permanent link right back to the original Beep annotation, keeping the full visual context—the screenshot, the browser data, everything—just a click away for your developers.
At the moment, status updates you make in Jira (like moving a ticket from "In Progress" to "Done") don't automatically sync back to change the annotation's status in Beep. The link inside the Jira ticket is your single source of truth for getting back to the original feedback source.
The core idea is to make feedback actionable in Jira as quickly as possible. While a two-way sync isn't here yet, that permanent link in each Jira ticket means the original context is never lost.
Can I Customize the Information Sent to the Jira Description Field?
Yes, you can, with a small catch. Beep automatically packs the Jira description with all the essential context your developers need to start working right away. It's a standardized template that includes:
The original comment text.
A direct link back to the exact webpage.
Browser and operating system data.
Screen resolution details.
The screenshot is also automatically attached to the issue. This core template is fixed to make sure every ticket is consistent and actionable. However, once the ticket is created, you can always jump in and edit the Jira description to add any extra information or context your team’s specific workflow requires. You get the best of both worlds: lightning-fast ticket creation and the flexibility to add more detail when you need it.
Ready to stop juggling feedback and start building a workflow that just works? Beep makes it incredibly easy to capture visual feedback and turn it into actionable Jira tickets in seconds. Get started for free today.
Comments